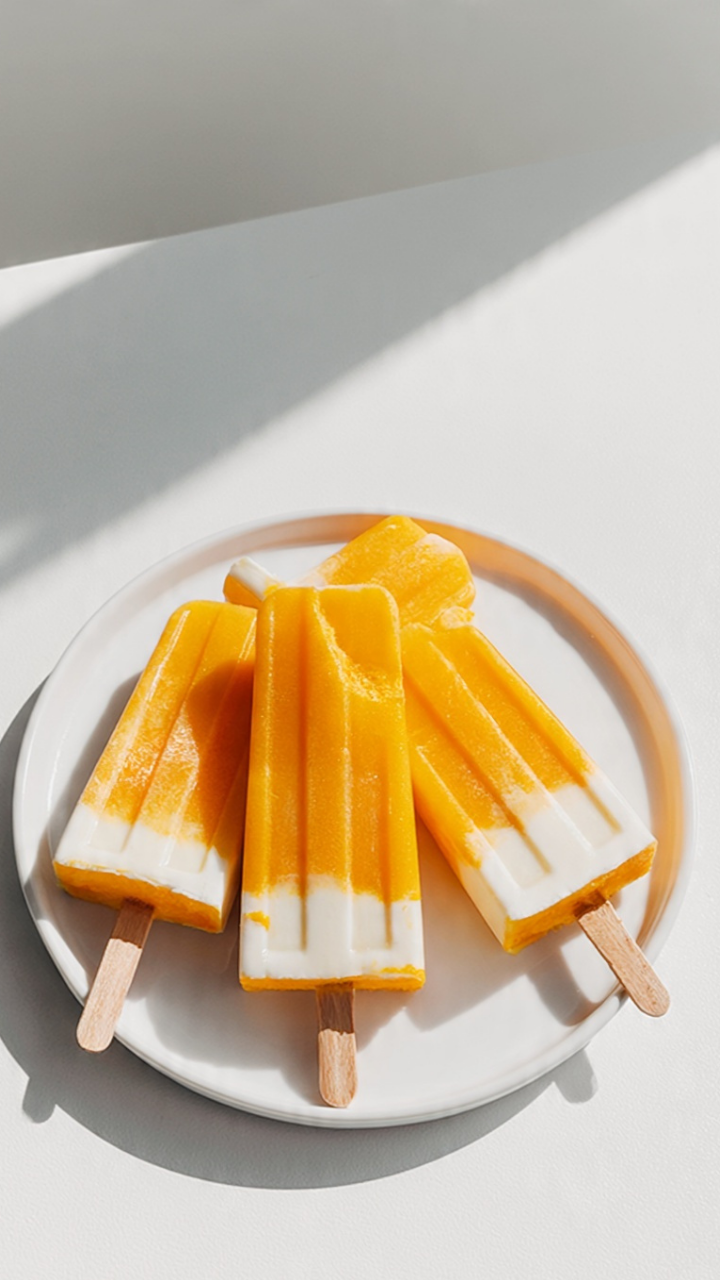
Creamsicles
There is something about creamsicles that instantly brings back that carefree, summer afternoon feeling. Bright citrus on the outside, creamy vanilla in the center, and that satisfying snap when you bite into one straight from the freezer. They are refreshing, nostalgic, and surprisingly simple to make at home. The orange layer is vibrant and fruity, while the creamy vanilla center is smooth and rich. Trust me, you’re going to love this.
Making them from scratch feels a little magical. You pour, freeze, layer, and suddenly you have a freezer full of sunshine on a stick. And now, let’s dive into why these homemade creamsicles are so much better than store bought.
The Perfect Balance of Bright and Creamy
The beauty of creamsicles lies in contrast. The outer layer is citrusy and lightly sweet, giving that refreshing pop. Then you hit the center, which is creamy, mellow, and comforting.
The combination of tangy orange and smooth vanilla creates balance. It is not overly sweet, not too tart, just perfectly refreshing. This one’s a total game-changer for hot days.
A Frozen Treat With Classic Roots
Creamsicles became popular decades ago as a frozen dessert that combined fruit and cream in one convenient treat. They were playful, colorful, and easy to enjoy.
This homemade version keeps that classic spirit but uses simple ingredients and real flavors. It feels nostalgic while tasting even better.
Why You’ll Make These Again and Again
Before we start mixing, here is why this recipe deserves a permanent place in your freezer.
Versatile: Perfect for summer parties, after school treats, or a light dessert.
Budget-Friendly: Made with simple pantry and fridge staples.
Quick and Easy: Just mix, layer, and freeze.
Customizable: Swap orange for other fruit juices.
Crowd-Pleasing: Kids and adults both love them.
Make-Ahead Friendly: Keep them frozen until ready to serve.
Great for Leftovers: They store well for weeks in the freezer.
Expert Tips for Smooth Layers
Small details make these perfect.
- Freeze each layer partially before adding the next to keep layers distinct.
- Use freshly squeezed orange juice for brighter flavor.
- Blend the creamy layer well to avoid separation.
- Let them sit at room temperature for a minute before removing from molds.
Those steps help you get that clean, beautiful center.
Kitchen Tools You’ll Need
You only need a few basics.
Popsicle Molds: For shaping and freezing.
Mixing Bowls: For preparing each layer.
Whisk: To blend ingredients smoothly.
Measuring Cups: For accuracy.
Now let’s talk ingredients.
Simple Ingredients That Create Magic
Each one plays a key role.
- Fresh Orange Juice: 2 cups. Forms the bright outer layer.
- Orange Zest: 1 teaspoon. Boosts citrus aroma.
- Granulated Sugar: ¼ cup. Sweetens the orange layer.
- Whole Milk: 1 cup. Forms the creamy base.
- Heavy Cream: 1 cup. Adds richness.
- Vanilla Extract: 1 teaspoon. Gives classic flavor.
- Granulated Sugar: ⅓ cup. Sweetens the creamy center.

Easy Ingredient Swaps
Flexibility keeps it fun.
Fresh Orange Juice: Bottled juice works if needed.
Whole Milk: Use 2 percent milk for a lighter texture.
Heavy Cream: Half and half can substitute.
Sugar: Adjust slightly based on sweetness preference.
The Two Key Ingredients
Orange Juice: It provides that refreshing, tangy brightness.
Heavy Cream: It ensures the center stays smooth and indulgent.
And now, let’s make them.
Let’s Build These Step by Step
Follow these steps for perfect layers.
- Preheat Your Equipment: No oven needed, prepare popsicle molds and ensure freezer space is ready.
- Combine Ingredients: In a bowl, whisk orange juice, orange zest, and ¼ cup sugar until dissolved.
- Prepare Your Cooking Vessel: Pour orange mixture halfway into each mold. Freeze for about 1 hour until partially set.
- Assemble the Dish: In another bowl, whisk whole milk, heavy cream, vanilla extract, and ⅓ cup sugar until smooth. Pour gently over the partially frozen orange layer.
- Cook to Perfection: Insert sticks and freeze for at least 4 hours or until fully solid.
- Finishing Touches: Run molds briefly under warm water to release.
- Serve and Enjoy: Enjoy immediately or wrap individually for storage.
Texture and Flavor Experience
The first bite gives you that icy citrus snap, followed by a creamy vanilla melt. The orange layer is refreshing and bright, while the center is silky and comforting. Together, they create a refreshing balance that feels just right.
Helpful Freezing Tips
- Do not overfill molds to prevent overflow.
- Freeze upright for clean layers.
- Cover molds if they do not have lids.
- Store wrapped to avoid freezer odors.
Common Mistakes to Avoid
- Skipping partial freeze between layers.
- Not dissolving sugar fully.
- Removing too early before fully frozen.
- Using too little cream, which affects texture.
Nutrition Facts
Servings: 8 popsicles
Calories per serving: Approximately 190
Note: These values are approximate.
Time Breakdown
Prep Time: 15 minutes
Cook Time: 0 minutes
Total Time: 4 hours 15 minutes
Make Ahead and Storage Tips
Store in an airtight container or wrapped individually in the freezer for up to 3 weeks. Keep them sealed to maintain freshness. No reheating required, just enjoy straight from the freezer.
Serving Ideas
Serve on a hot afternoon, alongside fresh fruit, or as a light dessert after dinner.
Creative Variations
Use mango juice instead of orange. Add a swirl of strawberry puree. Dip the frozen pops in melted chocolate for an extra treat.
Extra Flavor Tips
Add a splash of lemon juice to brighten the orange layer. Use high quality vanilla extract for the best flavor.
Make Them Look Stunning
Use clear molds to show off the bright orange and creamy white contrast. Keep layers even for visual appeal.
Variations to Try
- Add shredded coconut to the creamy layer.
- Use blood orange juice for deeper color.
- Add a touch of honey instead of sugar.
- Mix in a bit of yogurt for tanginess.
- Swirl orange and cream for a marbled effect.
FAQ’s
Q1: Can I use bottled orange juice?
Yes, fresh juice offers brighter flavor but bottled works.
Q2: How long do they need to freeze?
At least 4 hours until fully solid.
Q3: Can I make them dairy free?
Use coconut milk and dairy free cream alternatives.
Q4: How do I remove them easily?
Run molds under warm water briefly.
Q5: Can I reduce sugar?
Yes, adjust slightly to taste.
Q6: Do I need special molds?
Popsicle molds are ideal but small cups work too.
Q7: Can I double the recipe?
Yes, just ensure enough freezer space.
Q8: Why are my layers mixing?
The first layer likely was not frozen enough.
Q9: Can I store them long term?
Up to 3 weeks in a sealed container.
Q10: Are they kid friendly?
Absolutely, they are refreshing and fun.
Conclusion
Creamsicles are simple, refreshing, and full of nostalgic charm. With bright citrus and creamy vanilla layers, they deliver the perfect balance of flavor and texture. Once you make them at home, you may never go back to store bought. Give them a try and enjoy a little frozen sunshine.
Print
Creamsicles
- Prep Time: 15 minutes
- Cook Time: 0 minutes
- Total Time: 4 hours 15 minutes
- Yield: 8 popsicles 1x
- Category: Dessert
- Method: Freezing
- Cuisine: American
- Diet: Vegetarian
Description
Refreshing homemade creamsicles with a bright orange outer layer and a smooth, creamy vanilla center. A nostalgic frozen treat that is perfectly balanced and easy to make.
Ingredients
- 2 cups fresh orange juice
- 1 teaspoon orange zest
- ¼ cup granulated sugar
- 1 cup whole milk
- 1 cup heavy cream
- 1 teaspoon vanilla extract
- ⅓ cup granulated sugar
Instructions
- In a mixing bowl, whisk together fresh orange juice, orange zest, and ¼ cup granulated sugar until fully dissolved.
- Pour the orange mixture halfway into popsicle molds.
- Freeze for about 1 hour until partially set but not completely frozen.
- In another bowl, whisk together whole milk, heavy cream, vanilla extract, and ⅓ cup granulated sugar until smooth.
- Carefully pour the creamy mixture over the partially frozen orange layer.
- Insert popsicle sticks into each mold.
- Freeze for at least 4 hours or until fully solid.
- To release, run the molds briefly under warm water and gently pull out the creamsicles.
Notes
- Freeze the first layer long enough to prevent the layers from mixing.
- Use freshly squeezed orange juice for brighter flavor.
- Let the popsicles sit at room temperature for 1 minute before serving for easier biting.
- Store wrapped individually to prevent freezer burn.
Nutrition
- Serving Size: 1 popsicle
- Calories: 190
- Sugar: 21g
- Sodium: 35mg
- Fat: 9g
- Saturated Fat: 6g
- Unsaturated Fat: 2g
- Trans Fat: 0g
- Carbohydrates: 24g
- Fiber: 0g
- Protein: 2g
- Cholesterol: 30mg
Keywords: creamsicles, homemade popsicles, orange vanilla popsicles, creamy frozen treats