S’mores Cheesecake
There is something almost magical about the combination of chocolate, marshmallows, and graham crackers. It brings back campfire nights, sticky fingers, and that first warm bite of melted sweetness. Now imagine all of that wrapped into a rich, creamy cheesecake that feels both nostalgic and luxurious at the same time. Trust me, you’re going to love this. This one’s a total game-changer, and let me tell you, it’s worth every bite.
A Campfire Classic Turned Into Pure Dessert Bliss
If you grew up loving traditional s’mores, this dessert will feel like a warm hug. It takes the familiar trio of graham crackers, chocolate, and marshmallows and transforms them into something elegant enough for a celebration but comforting enough for a cozy night in.
S’mores themselves date back to early 20th century camping traditions in the United States. They were simple, fun, and designed to be shared. Turning those flavors into a baked cheesecake is a modern twist, but the heart of it remains the same, sweet, gooey, and impossible to resist. And now let’s dive into why this version works so beautifully every single time.
Why This Cheesecake Always Steals the Show
Before we get into the details, let me just say this dessert checks every box.
Versatile: It works for birthdays, holidays, summer barbecues, or even a random Tuesday when you need something indulgent.
Budget-Friendly: The ingredients are simple pantry staples like cream cheese, sugar, and graham crackers, nothing fancy required.
Quick and Easy: While it looks impressive, the steps are straightforward and manageable, even for beginners.
Customizable: You can adjust the chocolate intensity, add extra marshmallows, or even swirl in peanut butter if you like.
Crowd-Pleasing: Chocolate and marshmallow together are universally loved, so this never lasts long on the table.
Make-Ahead Friendly: It actually tastes better after chilling overnight, which makes entertaining stress-free.
Great for Leftovers: A slice the next day with coffee feels like a little luxury moment.
And now that you know why it deserves a spot in your kitchen, let’s talk about getting it just right.
Insider Secrets for a Perfect Bake Every Time
Cheesecake can feel intimidating, but a few small tricks make all the difference.
- Use room temperature cream cheese so the batter blends smoothly without lumps.
- Mix gently once you add the eggs to avoid too much air in the batter.
- Bake in a water bath to prevent cracks and keep the texture silky.
- Let it cool gradually in the oven with the door slightly open to avoid sudden temperature changes.
- Chill for at least 4 hours, preferably overnight, for the best flavor and structure.
These small steps turn a good cheesecake into a truly unforgettable one.
Essential Tools for Smooth Baking
Having the right tools makes the process feel effortless.
Springform Pan: This allows you to release the cake cleanly without damaging the sides.
Mixing Bowls: For combining crust and filling separately.
Electric Mixer: Helps create a smooth, creamy filling without overworking your arm.
Roasting Pan: Needed if you are using a water bath for even baking.
Rubber Spatula: Perfect for scraping down the bowl and folding gently.
Now that your kitchen is ready, let’s talk ingredients, because that is where the magic truly begins.
Ingredients You Will Need For This Cheesecake
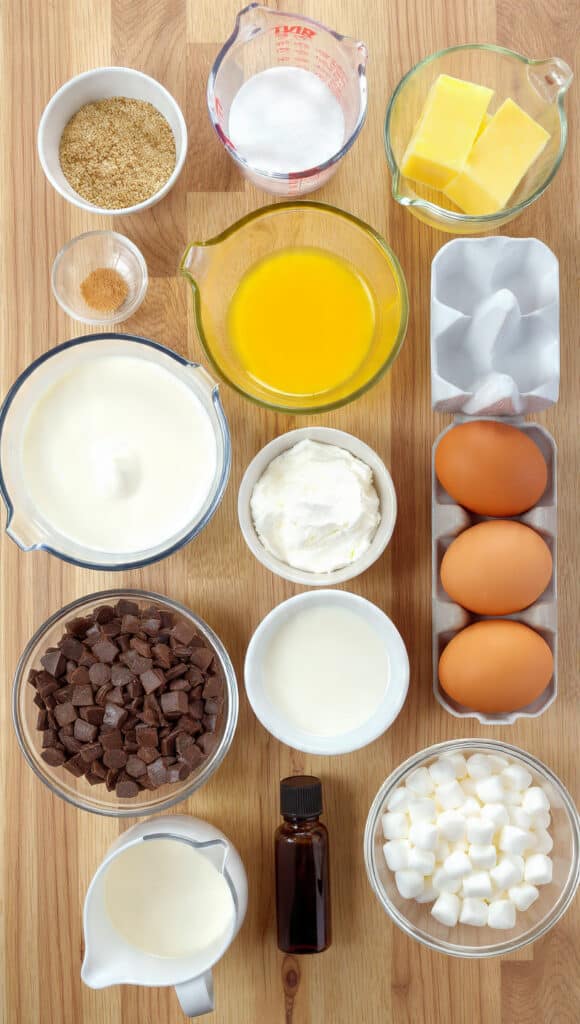
The beauty of this dessert lies in how simple ingredients come together in harmony.
- Graham Cracker Crumbs: 2 cups, about 200 grams. These create that classic campfire inspired base with a slightly sweet crunch.
- Granulated Sugar: 1 cup, 200 grams, divided. Adds sweetness to both crust and filling.
- Unsalted Butter: 1/2 cup, 113 grams, melted. Binds the crust and adds richness.
- Cream Cheese: 24 ounces, 680 grams, softened. The creamy heart of the cheesecake.
- Sour Cream: 1 cup, 240 grams. Adds tang and smooth texture.
- Large Eggs: 3, room temperature. Provide structure and stability.
- Vanilla Extract: 2 teaspoons. Enhances sweetness and depth.
- Semi Sweet Chocolate Chips: 1 cup, 170 grams, melted. Brings rich chocolate flavor.
- Heavy Cream: 1/2 cup, 120 milliliters. Used to create a smooth chocolate ganache.
- Mini Marshmallows: 2 cups, about 100 grams. Toasted on top for that signature finish.
Now that you have everything measured and ready, let’s look at a few ways you can tweak it if needed.
Flexible Swaps If You Need Them
Sometimes you work with what you have, and that is perfectly fine.
Graham Cracker Crumbs: Crushed digestive biscuits or vanilla wafers.
Sour Cream: Plain Greek yogurt for a similar tangy effect.
Semi Sweet Chocolate Chips: Dark chocolate chips if you prefer a deeper flavor.
Mini Marshmallows: Large marshmallows cut into halves.
With options in mind, let’s highlight what truly makes this dessert shine.
The Stars of the Show
Cream Cheese: This is the backbone of the cheesecake. Full fat cream cheese gives the richest, creamiest texture, which makes every bite feel indulgent.
Mini Marshmallows: When toasted, they turn golden and slightly gooey, creating that nostalgic campfire flavor right on top.
And now let’s dive into the cooking process, because this is where everything comes together.
Let’s Bake This Beauty Together
Get ready, because your kitchen is about to smell incredible.
- Preheat Your Equipment: Preheat your oven to 325 degrees Fahrenheit, 163 degrees Celsius. Prepare a springform pan by lightly greasing it.
- Combine Ingredients: Mix the graham cracker crumbs, 1/4 cup of the sugar, and melted butter until the mixture resembles wet sand.
- Prepare Your Cooking Vessel: Press the crust mixture firmly into the bottom of the springform pan. Bake for 10 minutes, then let it cool slightly.
- Assemble the Dish: Beat the cream cheese and remaining 3/4 cup sugar until smooth. Add sour cream and vanilla, then mix in eggs one at a time on low speed. Pour the filling over the crust.
- Cook to Perfection: Place the pan in a roasting pan and add hot water halfway up the sides. Bake for 55 to 65 minutes until the center is slightly jiggly. Turn off the oven and let it cool inside with the door slightly open for 1 hour.
- Finishing Touches: Melt the chocolate chips with heavy cream until smooth and spread over the cooled cheesecake. Top with mini marshmallows and toast lightly under a broiler for 1 to 2 minutes until golden.
- Serve and Enjoy: Chill for at least 4 hours. Slice with a warm knife for clean cuts and enjoy every creamy, chocolatey bite.
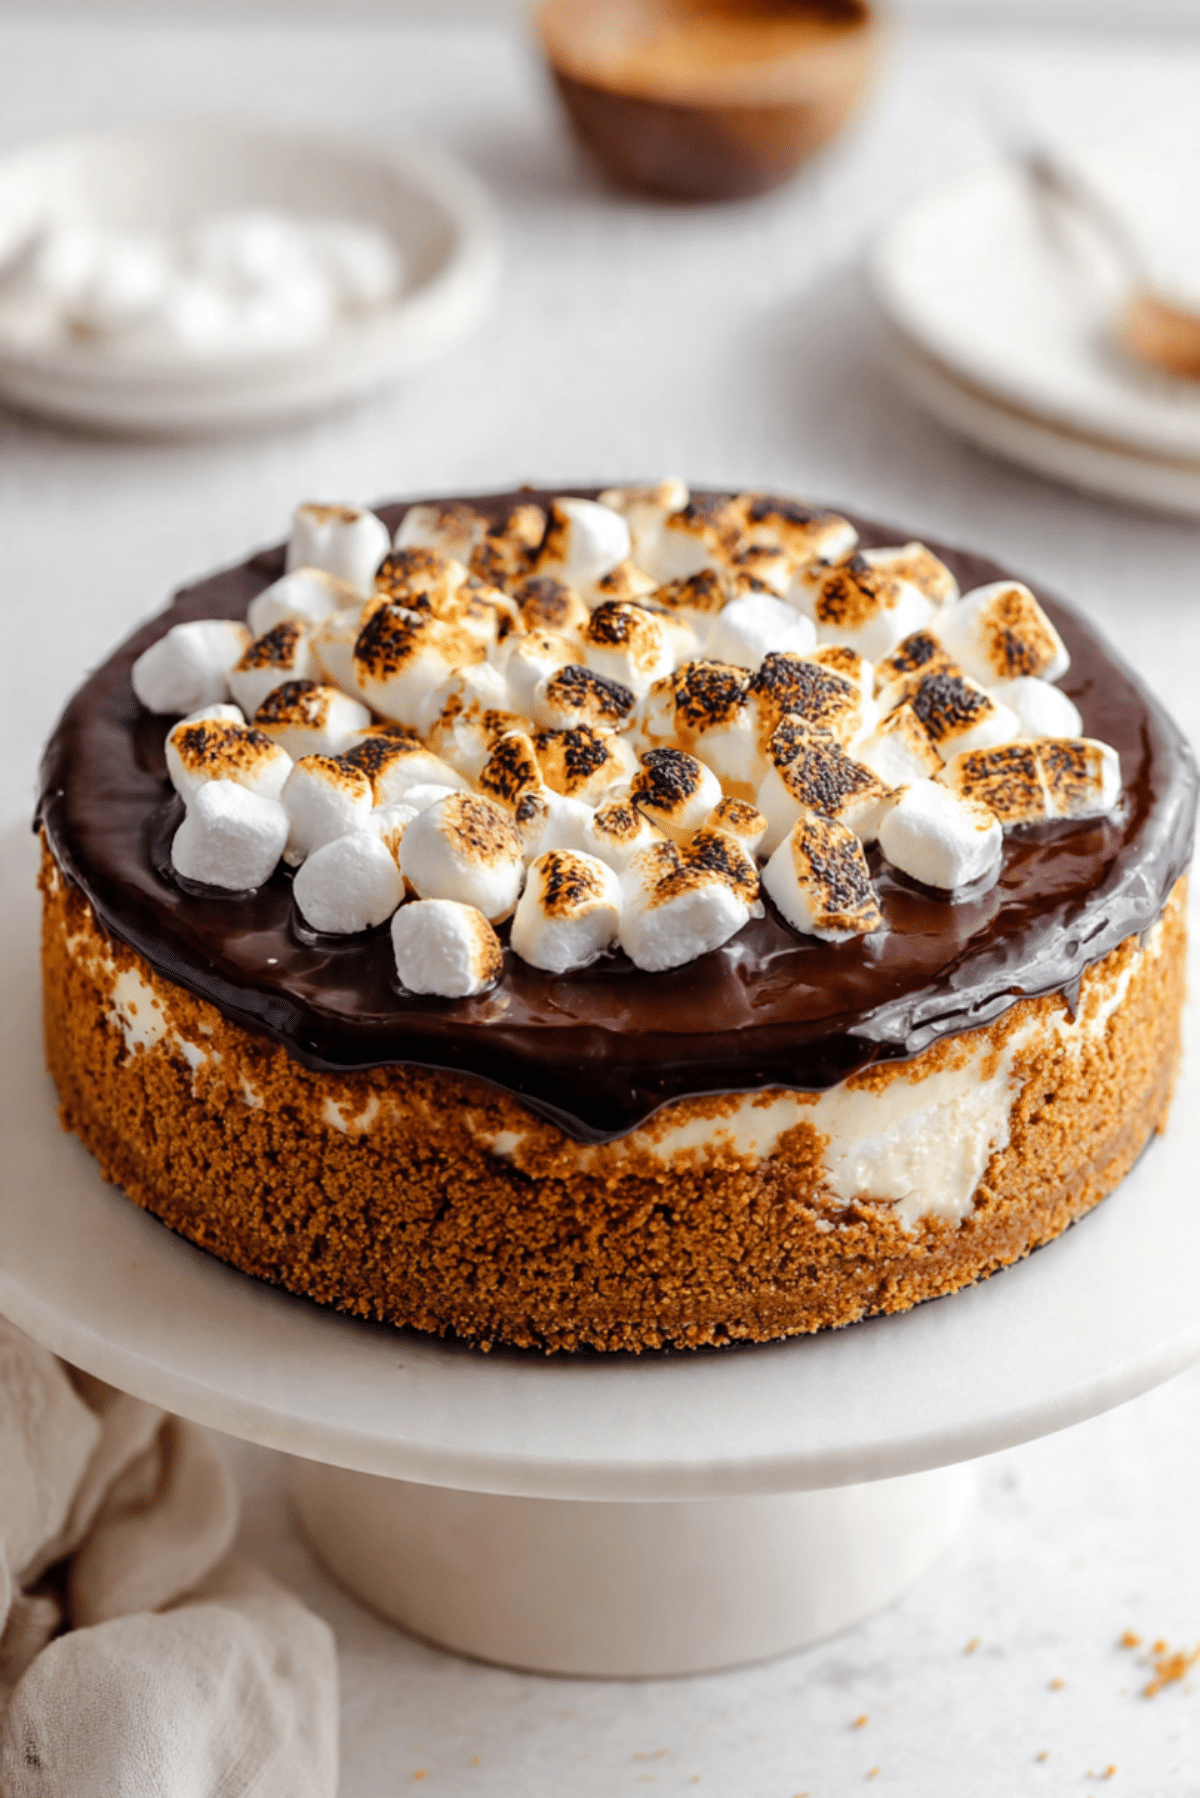
Texture and Flavor in Every Layer
The crust is buttery and slightly crunchy, creating the perfect base. The filling is dense yet creamy, with a gentle tang from the sour cream that balances the sweetness. Then comes the silky chocolate layer, rich and smooth. Finally, the toasted marshmallows add a soft, gooey contrast with caramelized edges. Every forkful gives you crunch, creaminess, and melt in your mouth sweetness all at once.
Smart Baking Tips for Success
A few extra pointers can make things even smoother.
- Let the cheesecake cool gradually to prevent cracks.
- Use a hot knife wiped clean between slices for neat presentation.
- Do not skip chilling time, it helps the flavors deepen.
- Toast marshmallows carefully, they brown quickly.
Common Mistakes and How to Fix Them
Even simple recipes have small pitfalls, but they are easy to avoid.
- Overmixing the batter can cause cracks, so mix gently after adding eggs.
- Skipping the water bath may result in uneven texture.
- Opening the oven door too early can cause sinking in the center.
- Overbrowning the marshmallows can make them taste slightly bitter.
Nutritional Snapshot
Servings: 12
Calories per serving: 420
Note: These are approximate values.
Timing at a Glance
Prep Time: 25 minutes
Cook Time: 1 hour 5 minutes
Total Time: 1 hour 30 minutes plus chilling
Make-Ahead and Storage Guide
This cheesecake actually benefits from being made a day ahead. Store it covered in the refrigerator for up to 5 days. You can freeze slices individually wrapped for up to 2 months. Thaw overnight in the refrigerator before serving.
Serving Ideas That Elevate Every Slice
Serve each slice with a drizzle of warm chocolate sauce or a sprinkle of crushed graham crackers for extra crunch. Fresh berries on the side add a pop of color and brightness that pairs beautifully with the richness.
Turn Leftovers Into Something New
Crumble leftover slices into parfait glasses with whipped cream for a layered dessert. Blend a small piece into a milkshake for an over the top treat. Or freeze cubes and dip them in melted chocolate for mini bites.
Extra Little Touches That Make a Difference
Add a pinch of sea salt on top for contrast. Use high quality chocolate for deeper flavor. Always allow the cake to come slightly to room temperature before serving for the creamiest texture.
Make It Look Bakery Worthy
Wipe the knife between each slice. Arrange extra toasted marshmallows in the center for height. Serve on a white cake stand to make the golden marshmallows pop.
Fun Variations to Explore
- Add a swirl of peanut butter into the filling before baking.
- Mix mini chocolate chips directly into the batter.
- Use chocolate graham crackers for a darker crust.
- Add a layer of chocolate ganache between crust and filling.
- Top with crushed chocolate bars for extra crunch.
FAQ’s
Q1: Can I make this without a water bath?
Yes, but the texture may be slightly less creamy and more prone to cracking.
Q2: How do I know when it is done?
The center should jiggle slightly but not look liquid.
Q3: Can I use low fat cream cheese?
Full fat gives the best texture, but low fat can work with a slightly lighter result.
Q4: How long should it chill?
At least 4 hours, though overnight is ideal.
Q5: Can I freeze the whole cake?
Yes, wrap it tightly and freeze for up to 2 months.
Q6: Why did my cheesecake crack?
Usually from overmixing or sudden temperature changes.
Q7: Can I make it gluten free?
Yes, use gluten free graham crackers for the crust.
Q8: How do I toast marshmallows safely?
Use the broiler and watch closely, they brown quickly.
Q9: Can I add extra chocolate?
Absolutely, swirl it into the batter or add more on top.
Q10: What pairs well with it?
Fresh berries, whipped cream, or a strong cup of coffee.
Conclusion
There is something truly special about turning a campfire favorite into a rich, creamy dessert that feels celebration worthy. This S’mores Cheesecake brings together crunch, creaminess, and gooey sweetness in every single bite. Give it a try in your own kitchen, and I promise, it will become one of those desserts everyone asks you to make again and again.
Print
S’mores Cheesecake
- Prep Time: 25 minutes
- Cook Time: 1 hour 5 minutes
- Total Time: 1 hour 30 minutes plus chilling
- Yield: 12 servings 1x
- Category: Dessert
- Method: Baking
- Cuisine: American
- Diet: Vegetarian
Description
A rich and creamy cheesecake inspired by classic campfire flavors, featuring a buttery graham cracker crust, smooth vanilla filling, silky chocolate ganache, and golden toasted marshmallows on top.
Ingredients
- 2 cups graham cracker crumbs (about 200 grams)
- 1 cup granulated sugar (200 grams), divided
- 1/2 cup unsalted butter (113 grams), melted
- 24 ounces cream cheese (680 grams), softened
- 1 cup sour cream (240 grams)
- 3 large eggs, room temperature
- 2 teaspoons vanilla extract
- 1 cup semi sweet chocolate chips (170 grams)
- 1/2 cup heavy cream (120 milliliters)
- 2 cups mini marshmallows (about 100 grams)
Instructions
- Preheat oven to 325 degrees Fahrenheit (163 degrees Celsius) and lightly grease a springform pan.
- In a bowl, mix graham cracker crumbs, 1/4 cup of the sugar, and melted butter until combined and resembling wet sand.
- Press the crust mixture firmly into the bottom of the springform pan. Bake for 10 minutes, then allow to cool slightly.
- Beat cream cheese with the remaining 3/4 cup sugar until smooth. Add sour cream and vanilla extract and mix well. Add eggs one at a time on low speed, mixing just until incorporated.
- Pour the filling over the cooled crust. Place the springform pan inside a roasting pan and add hot water halfway up the sides to create a water bath.
- Bake for 55 to 65 minutes, until the center is slightly jiggly but set around the edges. Turn off the oven and let the cheesecake cool inside with the door slightly open for 1 hour.
- Heat chocolate chips and heavy cream together until smooth to form a ganache. Spread evenly over the cooled cheesecake.
- Top with mini marshmallows and place under the broiler for 1 to 2 minutes, watching closely, until marshmallows are golden.
- Refrigerate for at least 4 hours or overnight before slicing and serving.
Notes
- Use room temperature cream cheese for a smooth filling without lumps.
- Do not overmix after adding the eggs to prevent cracks.
- Chill thoroughly before slicing for clean cuts and best texture.
- Watch the marshmallows carefully under the broiler as they brown quickly.
Nutrition
- Serving Size: 1 slice
- Calories: 420
- Sugar: 28g
- Sodium: 320mg
- Fat: 30g
- Saturated Fat: 18g
- Unsaturated Fat: 10g
- Trans Fat: 0.5g
- Carbohydrates: 34g
- Fiber: 1g
- Protein: 6g
- Cholesterol: 110mg
Keywords: smores cheesecake, campfire cheesecake, chocolate marshmallow dessert, graham cracker crust cheesecake, baked cheesecake recipe