Vanilla-Banana Pudding
The first spoonful of this dessert always takes me back to quiet afternoons in the kitchen, when patience paid off and simple ingredients turned into something comforting and nostalgic. Creamy vanilla pudding settles gently between soft banana slices and tender wafers, creating a dessert that feels familiar yet special every single time. Trust me, you’re going to love this, because it is smooth, sweet, and honestly worth every bite.
Why This Dessert Always Feels Like a Warm Hug
There is something incredibly soothing about the way creamy pudding and ripe bananas come together. It is not flashy or complicated, yet it delivers pure comfort with every layer. This is the kind of treat you make when you want something dependable, cozy, and guaranteed to make people smile.
A Little Background Behind This Classic Favorite
This pudding has roots in Southern kitchens, where layered desserts were often made to serve a crowd without much fuss. Over time, it became a staple at gatherings, holidays, and family dinners because it was easy to prepare and always satisfying. Its popularity grew thanks to its simple ingredients and the way it balances sweetness with soft textures.
What Makes This Recipe a Keeper
This is where things really shine, and now let’s dive into why this dessert deserves a permanent place in your recipe box.
Versatile: It works beautifully as a casual weeknight treat or as a make-ahead dessert for gatherings and celebrations.
Budget-Friendly: Basic pantry staples and fresh bananas keep costs low without sacrificing flavor.
Quick and Easy: No baking required, just simple steps and a little chilling time.
Customizable: You can adjust sweetness, layer thickness, or even add gentle twists if you feel creative.
Crowd-Pleasing: Kids and adults alike come back for seconds, sometimes thirds.
Make-Ahead Friendly: It actually tastes better after resting, which makes planning ahead effortless.
Great for Leftovers: The flavors continue to meld, keeping it delicious for days.
Chef Secrets for the Best Results Every Time
A great pudding is all about attention to small details, and these tips make a big difference.
- Use fully ripe bananas for the best natural sweetness and soft texture.
- Chill the pudding mixture slightly before layering so it sets smoothly.
- Let the assembled dessert rest in the refrigerator long enough for the wafers to soften perfectly.
Kitchen Tools You Will Want Ready
Before getting started, it helps to have everything within reach.
Mixing Bowl: Large enough to whisk pudding smoothly without spills.
Whisk: Ensures the pudding turns out lump-free and silky.
Serving Dish: A clear glass dish works best so the layers can shine.
Spatula: Helpful for spreading each layer evenly.
Ingredients You Will Need For This Recipe
All the ingredients work together to create balanced sweetness and creamy texture.
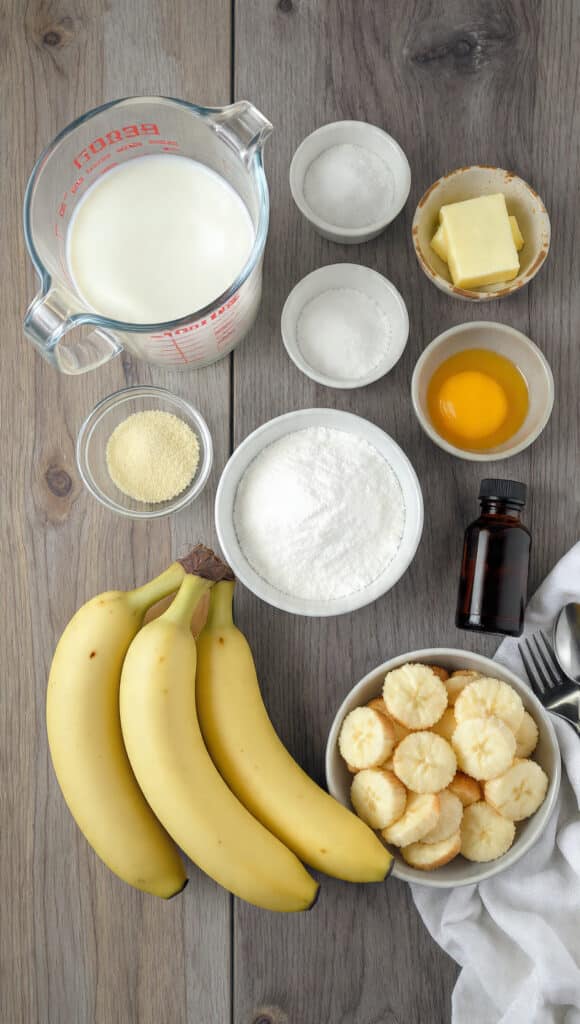
- Whole Milk: 3 cups, forms the creamy base of the pudding.
- Granulated Sugar: ¾ cup, adds gentle sweetness without overpowering.
- Cornstarch: ¼ cup, thickens the pudding to a luscious consistency.
- Salt: ¼ teaspoon, enhances the vanilla flavor.
- Egg Yolks: 4 large, add richness and smoothness.
- Unsalted Butter: 2 tablespoons, brings a velvety finish.
- Vanilla Extract: 2 teaspoons, delivers warm aromatic flavor.
- Ripe Bananas: 4 medium, sliced, provide natural sweetness and softness.
- Vanilla Wafers: 2 cups, create tender layers once softened.
Easy Ingredient Swaps If Needed
Sometimes you need flexibility, and that is totally fine.
Whole Milk: Can be replaced with low lactose milk for easier digestion.
Granulated Sugar: Light brown sugar can be used for a deeper flavor.
Vanilla Wafers: Plain tea cookies work as a gentle substitute.
Spotlight on Key Ingredients
Ripe Bananas: They bring natural sweetness and a soft bite that blends beautifully with the pudding.
Vanilla Extract: This is where the comforting aroma comes from, tying all the layers together.
Let’s Get Cooking Together
Now let’s dive into the heart of the process, where everything comes together step by step.
- Preheat Your Equipment: No oven needed here, but clear space in the refrigerator for chilling.
- Combine Ingredients: Whisk milk, sugar, cornstarch, salt, and egg yolks in a saucepan until smooth.
- Prepare Your Cooking Vessel: Place the saucepan over medium heat and whisk constantly.
- Assemble the Dish: Cook until thickened, then remove from heat and stir in butter and vanilla.
- Cook to Perfection: Let the pudding cool slightly so it thickens without forming lumps.
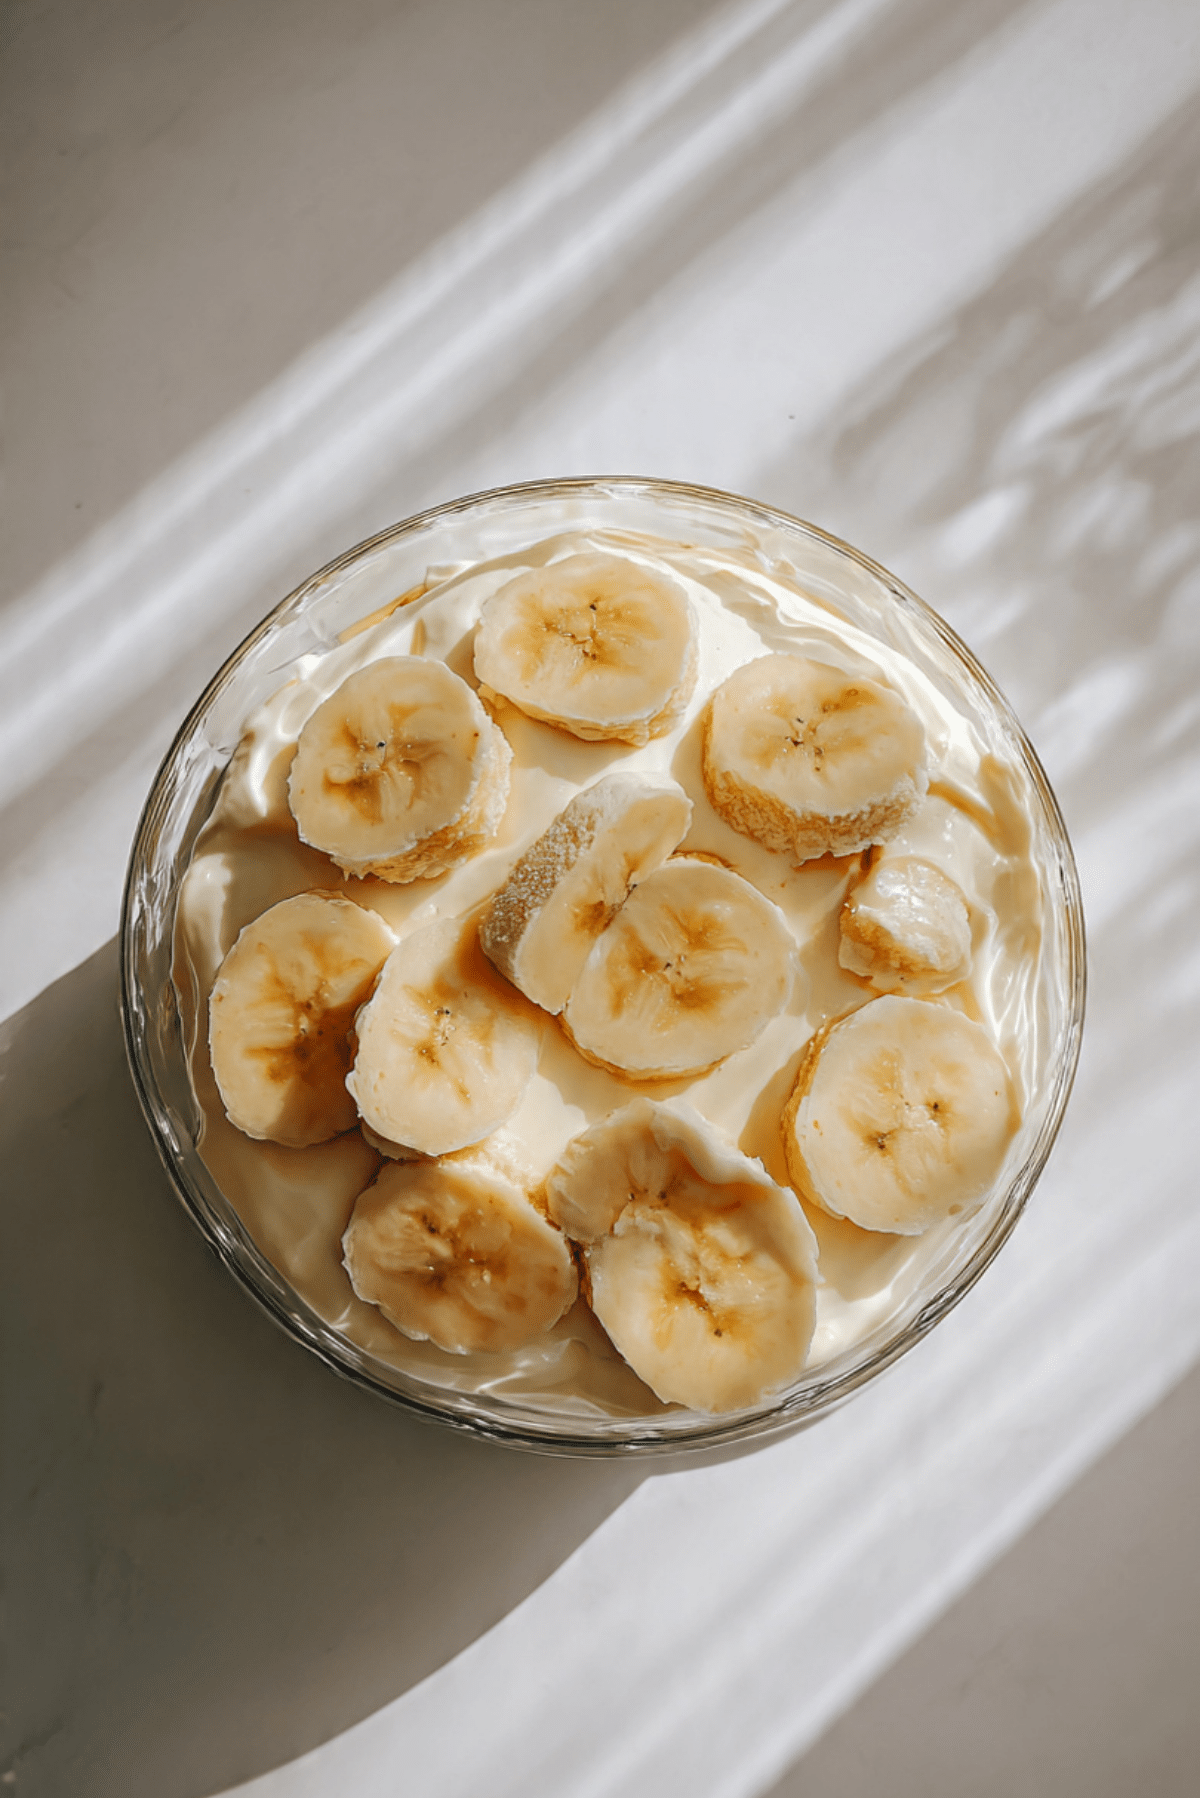
- Finishing Touches: Layer pudding, bananas, and wafers in a serving dish.
- Serve and Enjoy: Chill for at least two hours before serving.
How Texture and Flavor Come Together
As the dessert rests, the wafers soften gently, the bananas release subtle sweetness, and the vanilla pudding settles into a silky, spoonable texture. Each bite offers contrast between creamy, tender, and lightly structured layers.
Helpful Tips for Success
A few small adjustments can make a big difference.
- Slice bananas just before layering to keep them fresh.
- Press plastic wrap directly onto the pudding surface while cooling to prevent a skin.
- Chill long enough so the layers set cleanly.
What to Avoid for Best Results
Even simple desserts have pitfalls, but they are easy to avoid.
- Overcooking the pudding, which can make it grainy.
- Using underripe bananas, which lack sweetness.
- Skipping chill time, which affects texture.
Nutrition Facts Worth Knowing
Servings: 8
Calories per serving: Approximately 320
Note: These are approximate values.
Preparation Time Breakdown
Prep Time: 20 minutes
Cook Time: 15 minutes
Total Time: 35 minutes plus chilling time
Make-Ahead and Storage Tips
This dessert loves being made ahead. Store it covered in the refrigerator for up to three days. Freezing is not recommended, as the texture of the pudding and bananas can change once thawed.
Serving Ideas to Make It Special
Serve chilled straight from the dish, or portion into individual glasses for a more elegant presentation. A light dusting of crushed wafers on top adds visual charm.
Creative Ways to Use Leftovers
Leftover pudding can be layered into parfait cups or used as a filling for simple dessert jars with extra fruit.
Extra Tips for Flavor and Ease
Use a clear dish to show off the layers, and always taste the pudding before assembling to adjust sweetness if needed.
Make It a Showstopper
Arrange banana slices neatly along the sides of the dish and finish with a smooth pudding layer on top for a polished look.
Variations to Try Next Time
- Add a thin layer of chocolate pudding for contrast.
- Use sliced strawberries alongside bananas.
- Incorporate a hint of cinnamon into the pudding.
- Layer with crushed cookies for extra texture.
FAQ’s
1. Can I make this dessert a day ahead?
Yes, it actually tastes better after resting overnight.
2. How do I keep bananas from browning?
Assemble just before chilling and cover tightly.
3. Can I reduce the sugar?
You can slightly reduce it without affecting texture.
4. Is this dessert vegetarian?
Yes, it contains no meat or gelatin.
5. Can I use instant pudding instead?
You can, but homemade offers better flavor and texture.
6. How long does it last in the fridge?
Up to three days when properly covered.
7. Can I serve it warm?
It is best enjoyed chilled for proper texture.
8. What dish works best for layering?
A clear glass dish makes layering easy and attractive.
9. Can I add whipped topping?
Yes, a light topping works well if added before serving.
10. Does it travel well?
Yes, keep it chilled and covered during transport.
Conclusion
This dessert proves that simple ingredients can create something truly memorable. Creamy, comforting, and endlessly satisfying, it is the kind of recipe you come back to again and again. Let me tell you, it is a total game-changer for easy desserts at home.
Print
Vanilla-Banana Pudding
- Prep Time: 20 minutes
- Cook Time: 15 minutes
- Total Time: 35 minutes plus chilling
- Yield: 8 servings 1x
- Category: Dessert
- Method: Stovetop
- Cuisine: American
- Diet: Vegetarian
Description
A creamy layered dessert made with smooth vanilla pudding, ripe bananas, and soft vanilla wafers that come together into a comforting classic everyone loves.
Ingredients
- 3 cups whole milk
- ¾ cup granulated sugar
- ¼ cup cornstarch
- ¼ teaspoon salt
- 4 large egg yolks
- 2 tablespoons unsalted butter
- 2 teaspoons vanilla extract
- 4 medium ripe bananas, sliced
- 2 cups vanilla wafers
Instructions
- In a mixing bowl, whisk together the milk, sugar, cornstarch, salt, and egg yolks until completely smooth.
- Pour the mixture into a saucepan and place over medium heat, whisking constantly until it thickens into a creamy pudding.
- Remove from heat and stir in the butter and vanilla extract until fully melted and combined.
- Let the pudding cool slightly, then begin layering pudding, banana slices, and vanilla wafers in a serving dish.
- Repeat layers until all ingredients are used, finishing with a layer of pudding on top.
- Cover and refrigerate for at least 2 hours before serving.
Notes
- Use ripe bananas for the best sweetness and texture.
- Cover pudding with plastic wrap touching the surface while cooling to prevent a skin.
- Chilling overnight enhances flavor and texture.
Nutrition
- Serving Size: 1 portion
- Calories: 320
- Sugar: 32g
- Sodium: 180mg
- Fat: 10g
- Saturated Fat: 6g
- Unsaturated Fat: 3g
- Trans Fat: 0g
- Carbohydrates: 52g
- Fiber: 2g
- Protein: 6g
- Cholesterol: 120mg
Keywords: vanilla pudding, banana dessert, layered pudding, no bake dessert, classic dessert