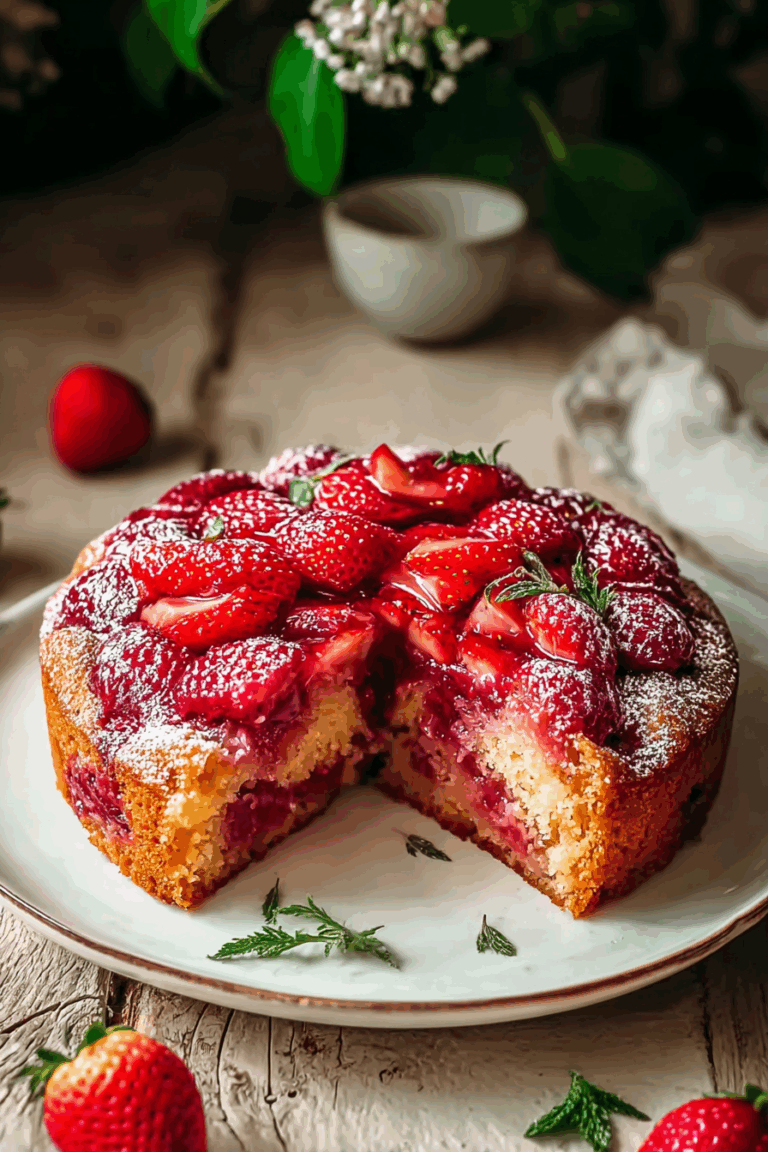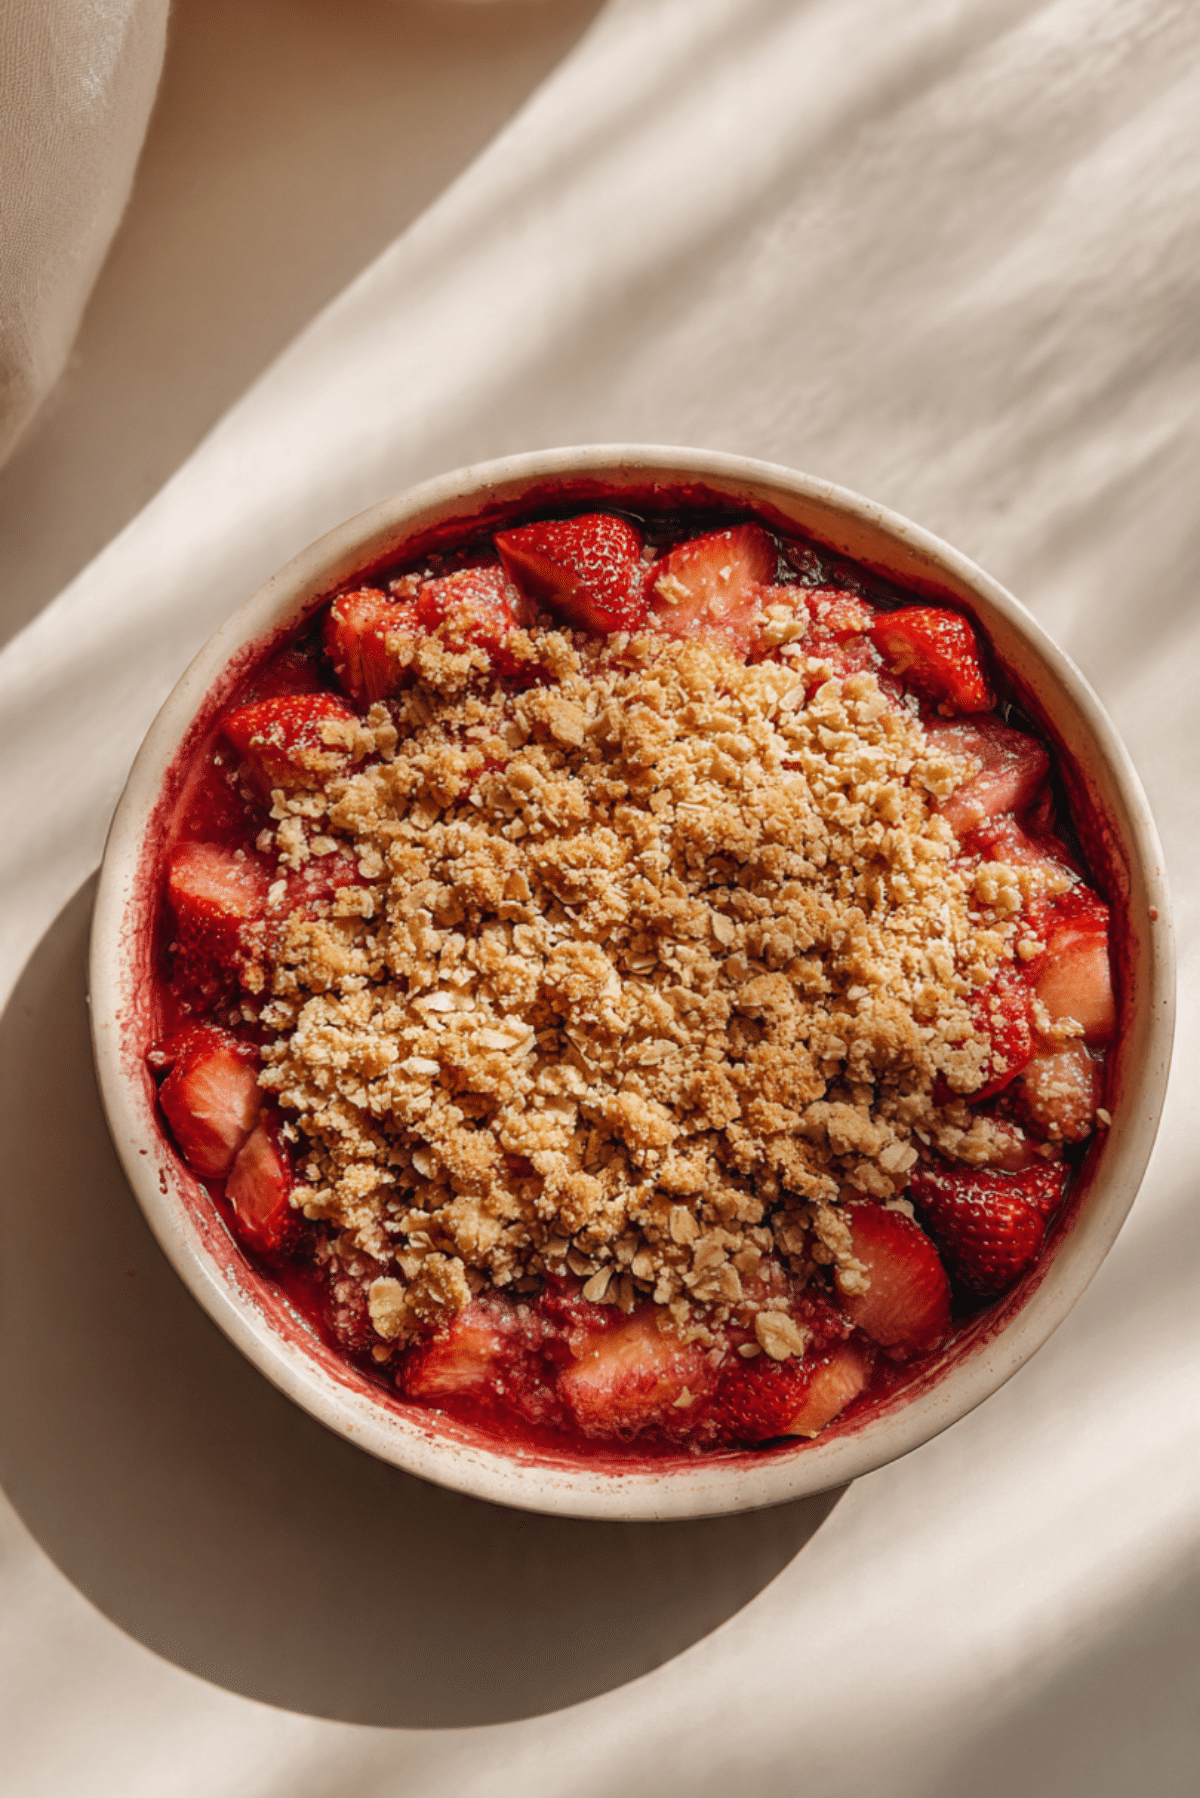
Strawberry Vanilla Crisp
There is something almost magical about pulling a bubbling dish of Strawberry Vanilla Crisp out of the oven. The sweet aroma of ripe strawberries mingling with warm vanilla and toasted oats fills the kitchen in a way that instantly makes everything feel cozy. The top turns golden and crisp while the fruit underneath becomes soft, jammy, and glossy. Trust me, you’re going to love this. It is simple, comforting, and somehow tastes like summer and home all at once.
Why This Sweet and Crunchy Dessert Wins Every Time
You know those desserts that look impressive but secretly take very little effort? This is one of them. The contrast between the juicy fruit and the buttery crumble topping makes every bite interesting. It is sweet but not overwhelming, rich yet balanced by the brightness of fresh berries. Let me tell you, it’s worth every bite.
A Classic Crisp with Simple Roots
Fruit crisps have been around for generations, especially in American and British kitchens where seasonal fruit needed a quick and satisfying topping. Instead of fussing with pie dough, home cooks would scatter a mixture of flour, oats, sugar, and butter over fruit and bake it until golden. Vanilla became a natural companion to berries, enhancing their sweetness and adding warmth. Over time, this humble dessert became a family favorite that shows up at potlucks, Sunday dinners, and summer gatherings.
The Reasons You Will Keep Coming Back to This Dessert
Before we dive into the details, let’s talk about why this one truly stands out.
Versatile: You can serve it warm with ice cream, chilled straight from the fridge, or even for brunch with yogurt. It fits any occasion.
Budget-Friendly: Strawberries, oats, flour, and sugar are simple ingredients that do not cost much, especially during berry season.
Quick and Easy: There is no complicated dough or chilling time. You mix, layer, and bake.
Customizable: Swap some strawberries for raspberries or blueberries, or adjust the sweetness to your liking.
Crowd-Pleasing: The balance of crisp topping and soft fruit wins over both kids and adults.
Make-Ahead Friendly: You can assemble it earlier in the day and bake when ready.
Great for Leftovers: The flavors deepen overnight, making the next day’s serving even better.
Chef Secrets for the Perfect Crisp
Now let’s get a little insider knowledge in your corner.
- Use ripe but firm strawberries so they hold their shape while baking.
- Toss the fruit with sugar and cornstarch thoroughly so the juices thicken properly.
- Keep the butter cold when mixing the topping, this helps create that crumbly texture.
- Do not press the topping down too firmly, you want air pockets for crispness.
- Let it rest for at least 10 minutes after baking so the filling sets slightly.
Kitchen Tools That Make It Easy
Before we start mixing, here are the essentials.
Mixing Bowls: One for the fruit and one for the crumble topping.
9 inch Baking Dish: A round or square ceramic dish works beautifully.
Pastry Cutter or Fork: To blend the butter into the dry ingredients.
Measuring Cups and Spoons: Accuracy keeps the texture just right.
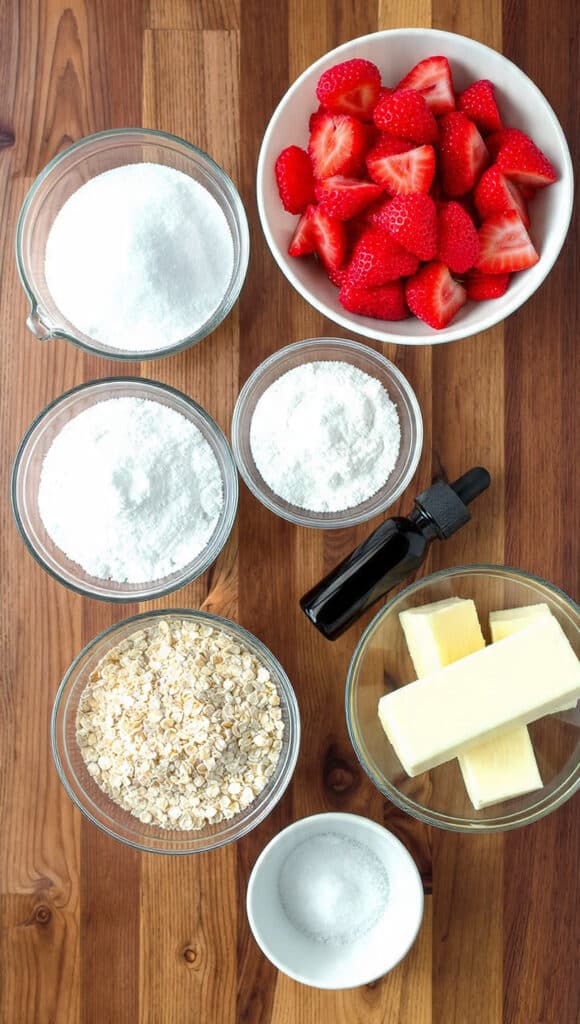
Ingredients That Bring It All Together
Now let’s dive into the heart of this dish, the ingredients that create that irresistible harmony of sweet and crisp.
- Fresh Strawberries: 4 cups sliced, about 600 grams, they provide natural sweetness and vibrant color.
- Granulated Sugar: 1 cup total, divided, adds sweetness and helps the fruit release juices.
- Cornstarch: 2 tablespoons, thickens the strawberry filling.
- Vanilla Extract: 2 teaspoons, enhances and deepens the berry flavor.
- All Purpose Flour: 1 cup, forms the base of the crumble topping.
- Old Fashioned Rolled Oats: 1 cup, creates texture and crunch.
- Unsalted Butter: 1/2 cup, 113 grams, cold and cubed, binds the topping and adds richness.
- Salt: 1/4 teaspoon, balances sweetness.
Simple Ingredient Swaps If You Need Them
Sometimes you work with what you have, and that is perfectly fine.
Fresh Strawberries: Frozen strawberries, thawed and drained.
Granulated Sugar: Light brown sugar for a deeper caramel note.
All Purpose Flour: Gluten free all purpose flour blend.
Unsalted Butter: Plant based butter alternative.
Spotlight on the Stars of the Dish
Let’s take a closer look at what makes this dessert shine.
Strawberries: When baked, they become soft and syrupy, releasing juices that mingle with sugar and vanilla into a luscious filling.
Vanilla Extract: Just a couple of teaspoons transform the flavor from simple fruit to something warm and rounded.
Let’s Bake This Beauty Together
And now let’s dive into the fun part, bringing everything together step by step.
- Preheat Your Equipment: Preheat your oven to 375 degrees Fahrenheit and lightly grease a 9 inch baking dish.
- Combine Ingredients: In a large bowl, mix the sliced strawberries with 1/2 cup of sugar, cornstarch, and vanilla extract until evenly coated.
- Prepare Your Cooking Vessel: Transfer the strawberry mixture into the prepared baking dish and spread it into an even layer.
- Assemble the Dish: In another bowl, combine the flour, rolled oats, remaining 1/2 cup sugar, and salt. Cut in the cold butter using a fork or pastry cutter until the mixture resembles coarse crumbs. Sprinkle this evenly over the strawberries.
- Cook to Perfection: Bake for 35 minutes, or until the topping is golden brown and the filling is bubbling around the edges.
- Finishing Touches: Remove from the oven and let it rest for at least 10 minutes so the filling thickens slightly.
- Serve and Enjoy: Spoon into bowls and serve warm, maybe with a scoop of vanilla ice cream if you are feeling indulgent.
The Texture and Flavor Story in Every Bite
As it bakes, the strawberries release juices that thicken into a glossy, ruby colored filling. The topping turns golden and crisp, with oats that toast gently in the oven. When you dig your spoon in, you get that satisfying crackle from the top followed by the soft, jammy fruit underneath. The vanilla weaves through it all, adding warmth without overpowering the natural brightness of the berries.
Helpful Tips to Make It Even Better
A few extra tricks can elevate the whole experience.
- Use chilled butter for a crumbly topping that stays crisp.
- If the fruit looks extra juicy, add an extra teaspoon of cornstarch.
- Place the baking dish on a sheet pan to catch any bubbling juices.
- Let it cool slightly before serving so the filling sets properly.
Mistakes to Skip for Best Results
Even simple desserts have a few pitfalls.
- Do not skip the cornstarch, or the filling may turn runny.
- Avoid overmixing the topping, it should stay crumbly.
- Do not underbake, the topping should be golden and the filling visibly bubbling.
- Resist serving immediately from the oven, resting time matters.
Nutrition Snapshot You Should Know
Servings: 6
Calories per serving: 320
Note: These are approximate values.
Time Breakdown for Easy Planning
Prep Time: 15 minutes
Cook Time: 35 minutes
Total Time: 50 minutes
Make It Ahead and Store It Smartly
If you want to prepare in advance, assemble the dish, cover it tightly, and refrigerate for up to 24 hours before baking. Leftovers can be stored in the refrigerator for up to 3 days. Reheat in the oven at 325 degrees Fahrenheit until warmed through, or microwave individual portions. You can also freeze it after baking, wrapped well, for up to 2 months. Thaw overnight in the refrigerator before reheating.
Serving Ideas That Feel Extra Special
Serve it warm with a scoop of vanilla ice cream that melts into the crevices. A dollop of lightly sweetened whipped cream works beautifully too. For brunch, try a spoonful over Greek yogurt with a drizzle of honey.
Give Leftovers a Fresh Twist
Leftover portions can be layered into parfait glasses with yogurt. You can also spoon it over pancakes or waffles for a fruity topping. Some people even fold a chilled portion into oatmeal for a sweet morning treat.
Extra Little Touches That Make a Difference
Add a pinch of cinnamon to the topping for warmth. A squeeze of lemon juice in the strawberries can brighten the flavor. Always taste your berries first and adjust sugar slightly if needed.
Turn It Into a True Showpiece
Bake it in a beautiful ceramic dish and serve it straight at the table. A light dusting of powdered sugar just before serving adds a soft, elegant look. The golden top against the red filling is already stunning, so let it shine.
Fun Variations to Try Next Time
- Add a handful of sliced almonds to the topping for extra crunch.
- Mix strawberries with blueberries for a mixed berry version.
- Stir white chocolate chips into the topping for a sweeter twist.
- Add a tablespoon of lemon zest to the filling for brightness.
- Swap half the oats for shredded coconut for a tropical vibe.
FAQ’s
Q1: Can I use frozen strawberries?
Yes, just thaw and drain them first to avoid excess liquid.
Q2: How do I know when it is done?
The topping should be golden and the filling should bubble around the edges.
Q3: Can I reduce the sugar?
You can slightly reduce it, especially if your strawberries are very sweet.
Q4: What if my topping is too dry?
Add a tablespoon of cold butter and mix gently.
Q5: Can I make it gluten free?
Yes, use a gluten free flour blend and certified gluten free oats.
Q6: Why is my filling runny?
It may need more cornstarch or more resting time after baking.
Q7: Can I double the recipe?
Absolutely, use a larger baking dish and adjust baking time slightly.
Q8: Is it better warm or cold?
Both are delicious, but warm with ice cream is a total game changer.
Q9: Can I prepare the topping ahead?
Yes, store it in the refrigerator for up to 2 days before using.
Q10: How long does it last?
Up to 3 days in the refrigerator when stored properly.
Conclusion
There is something deeply comforting about a warm dish of Strawberry Vanilla Crisp sitting on the table, ready to be shared. It is simple, honest, and bursting with flavor. Once you try it, you will see why this one is a keeper. Gather your ingredients, preheat that oven, and let your kitchen fill with the sweet scent of strawberries and vanilla. You deserve a dessert that feels this good.
Print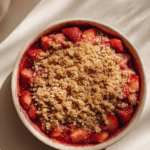
Strawberry Vanilla Crisp
- Prep Time: 15 minutes
- Cook Time: 35 minutes
- Total Time: 50 minutes
- Yield: 6 servings 1x
- Category: Dessert
- Method: Baking
- Cuisine: American
- Diet: Vegetarian
Description
A warm and comforting strawberry dessert with juicy vanilla-kissed berries bubbling under a golden oat crumble topping. Simple ingredients come together for a crisp that is sweet, slightly tart, and perfectly textured in every bite.
Ingredients
- 4 cups fresh strawberries, sliced (about 600 grams)
- 1 cup granulated sugar, divided
- 2 tablespoons cornstarch
- 2 teaspoons vanilla extract
- 1 cup all purpose flour
- 1 cup old fashioned rolled oats
- 1/2 cup unsalted butter, cold and cubed (113 grams)
- 1/4 teaspoon salt
Instructions
- Preheat oven to 375 degrees Fahrenheit and lightly grease a 9 inch baking dish.
- In a large bowl, combine sliced strawberries with 1/2 cup granulated sugar, cornstarch, and vanilla extract. Mix until evenly coated.
- Transfer the strawberry mixture into the prepared baking dish and spread evenly.
- In a separate bowl, mix flour, rolled oats, remaining 1/2 cup sugar, and salt. Cut in the cold cubed butter using a fork or pastry cutter until the mixture resembles coarse crumbs.
- Sprinkle the crumble mixture evenly over the strawberries.
- Bake for 35 minutes, or until the topping is golden brown and the filling is bubbling around the edges.
- Remove from oven and let rest for at least 10 minutes before serving.
Notes
- Let the crisp cool slightly so the filling thickens properly.
- If the strawberries are extra juicy, add an additional teaspoon of cornstarch.
- Serve warm with vanilla ice cream or whipped cream for extra indulgence.
- Store leftovers in the refrigerator for up to 3 days.
Nutrition
- Serving Size: 1 serving
- Calories: 320
- Sugar: 32g
- Sodium: 95mg
- Fat: 14g
- Saturated Fat: 8g
- Unsaturated Fat: 5g
- Trans Fat: 0g
- Carbohydrates: 46g
- Fiber: 3g
- Protein: 3g
- Cholesterol: 30mg
Keywords: strawberry vanilla crisp, strawberry dessert, fruit crisp, baked strawberry crumble, easy berry dessert