Peppermint Bark
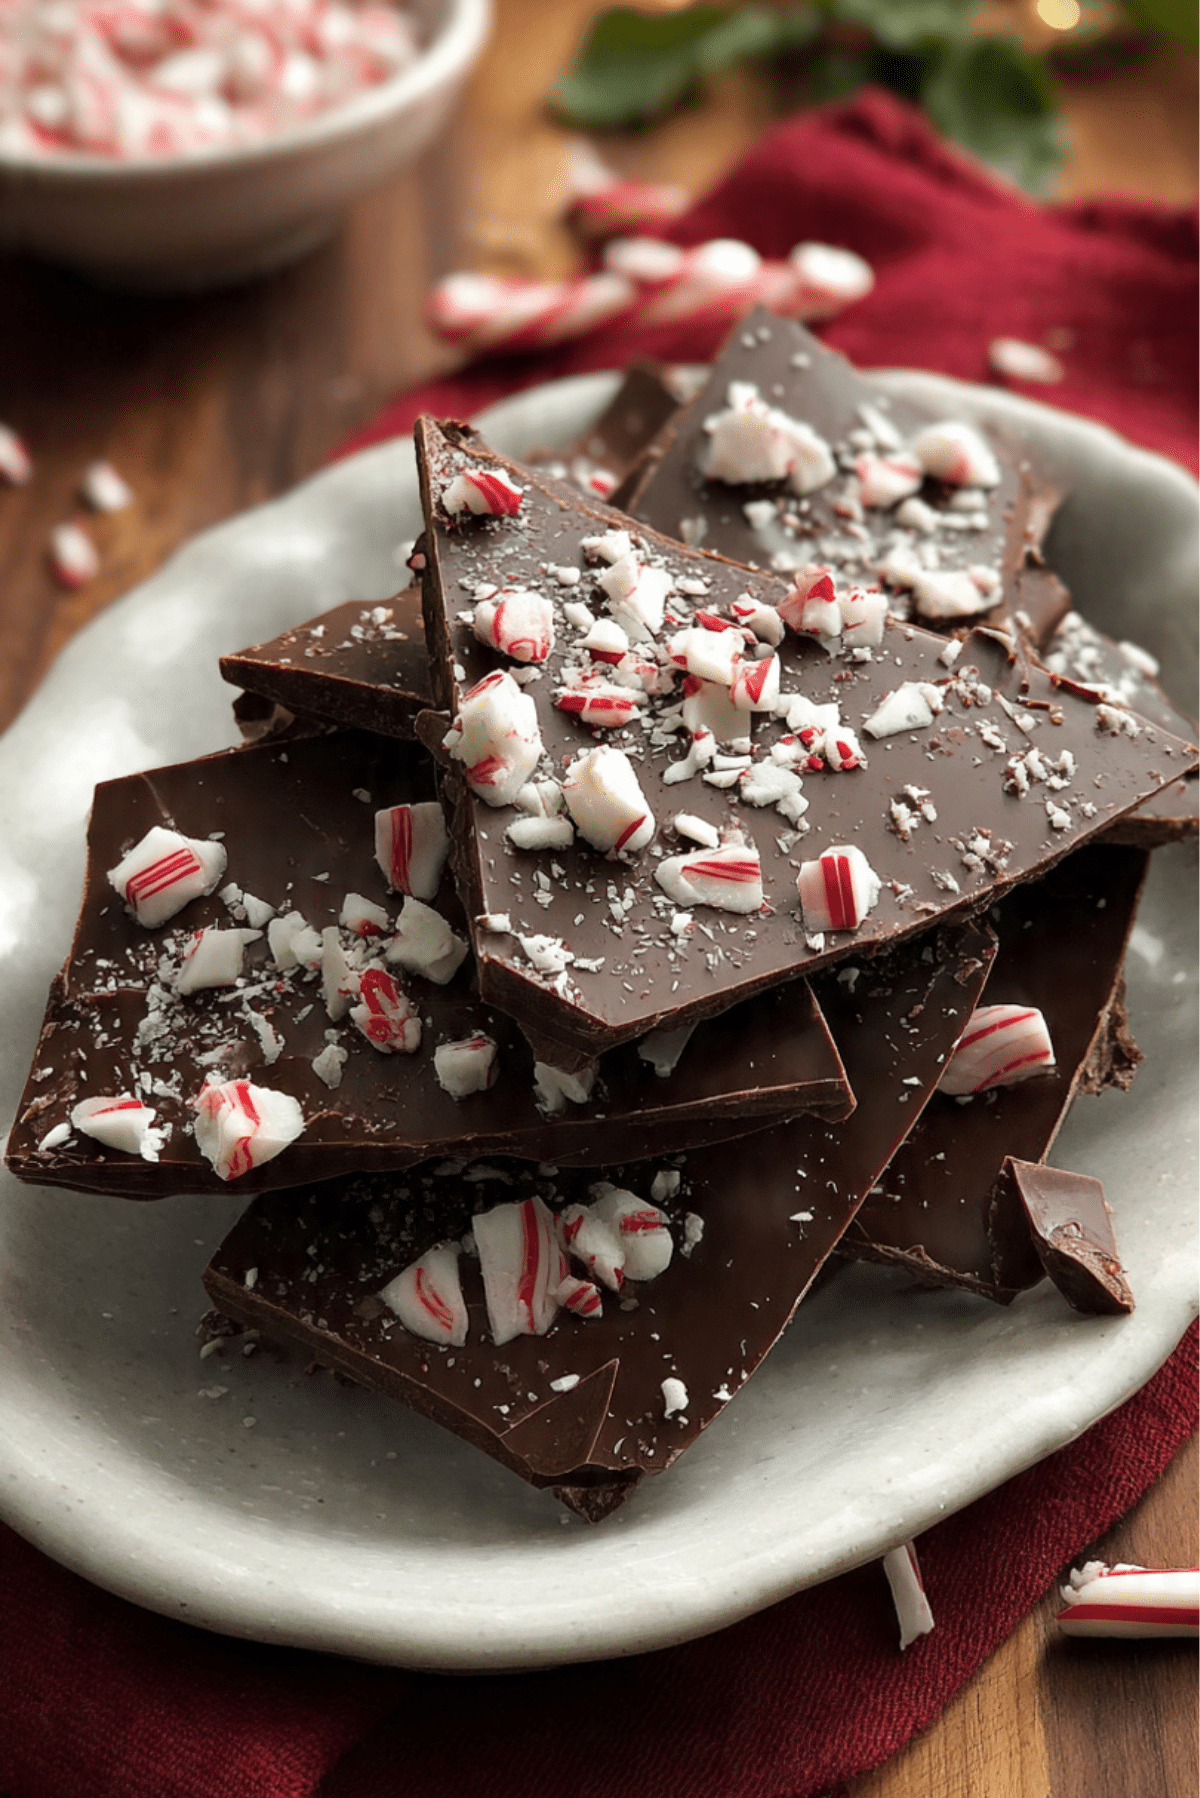
There’s something about the crisp chill of winter that makes peppermint bark feel like a little slice of magic. The crack of the chocolate, the shimmer of crushed candy canes, the creamy sweetness layered with a refreshing peppermint punch — it’s not just a treat, it’s a moment. Whether you’re nibbling on a piece by the fireplace or wrapping it in cellophane for a thoughtful gift, peppermint bark never fails to bring joy.
Behind the Recipe
This recipe has become something of a tradition in our kitchen. Every year as the holidays roll in, the scent of peppermint and melting chocolate signals the start of the festive season. I remember making it with my grandmother, crushing candy canes with a rolling pin while sneaking more than a few pieces for myself. Now it’s my turn to pass it on, sharing the sweet simplicity of something homemade and full of heart.
Recipe Origin or Trivia
Peppermint bark might feel like a recent treat, but its origins trace back to the 1960s. Inspired by traditional European layered chocolates like mendiants and chocolate bark, American candy makers gave it a wintery twist by adding peppermint. Now, it’s a staple across holiday dessert tables, gourmet shops, and gift baskets. And while many buy it, nothing compares to making your own at home.
Why You’ll Love Peppermint Bark
This one’s a total game-changer, and here’s why:
Versatile: Enjoy it solo, crumble it over ice cream, or package it up as homemade holiday gifts.
Budget-Friendly: Just a handful of ingredients make a big batch, perfect for gifting or snacking.
Quick and Easy: No baking required, and it comes together in less than an hour.
Customizable: Play around with chocolate types, add flavors like espresso or orange zest, or use festive sprinkles.
Crowd-Pleasing: Everyone from kids to grandparents loves this treat. It disappears fast!
Make-Ahead Friendly: Prep a batch days ahead and keep it ready for guests or gifting.
Great for Leftovers: Leftover peppermint bark can be chopped and mixed into cookies or brownies for an extra festive touch.
Chef’s Pro Tips for Perfect Results
This recipe is easy, but a few tricks will take it to the next level.
- Use quality chocolate: Since chocolate is the main ingredient, the better the chocolate, the better the bark.
- Melt slowly and carefully: Use a double boiler or microwave in short bursts to avoid burning.
- Chill in stages: Let the first chocolate layer set slightly before adding the next so they bond but don’t blend.
- Crush candy canes right before using: This keeps the pieces crisp and colorful.
- Don’t skip the parchment paper: It makes removing and breaking the bark super easy.
Kitchen Tools You’ll Need
No fancy equipment here, just the basics that make candy magic happen.
Baking Sheet: To spread and set the layers of bark.
Parchment Paper: Prevents sticking and makes cleanup a breeze.
Double Boiler or Microwave-Safe Bowl: For gently melting the chocolate.
Spatula or Offset Spreader: To evenly layer the chocolate.
Rolling Pin or Heavy Object: For crushing the candy canes.
Ingredients in Peppermint Bark
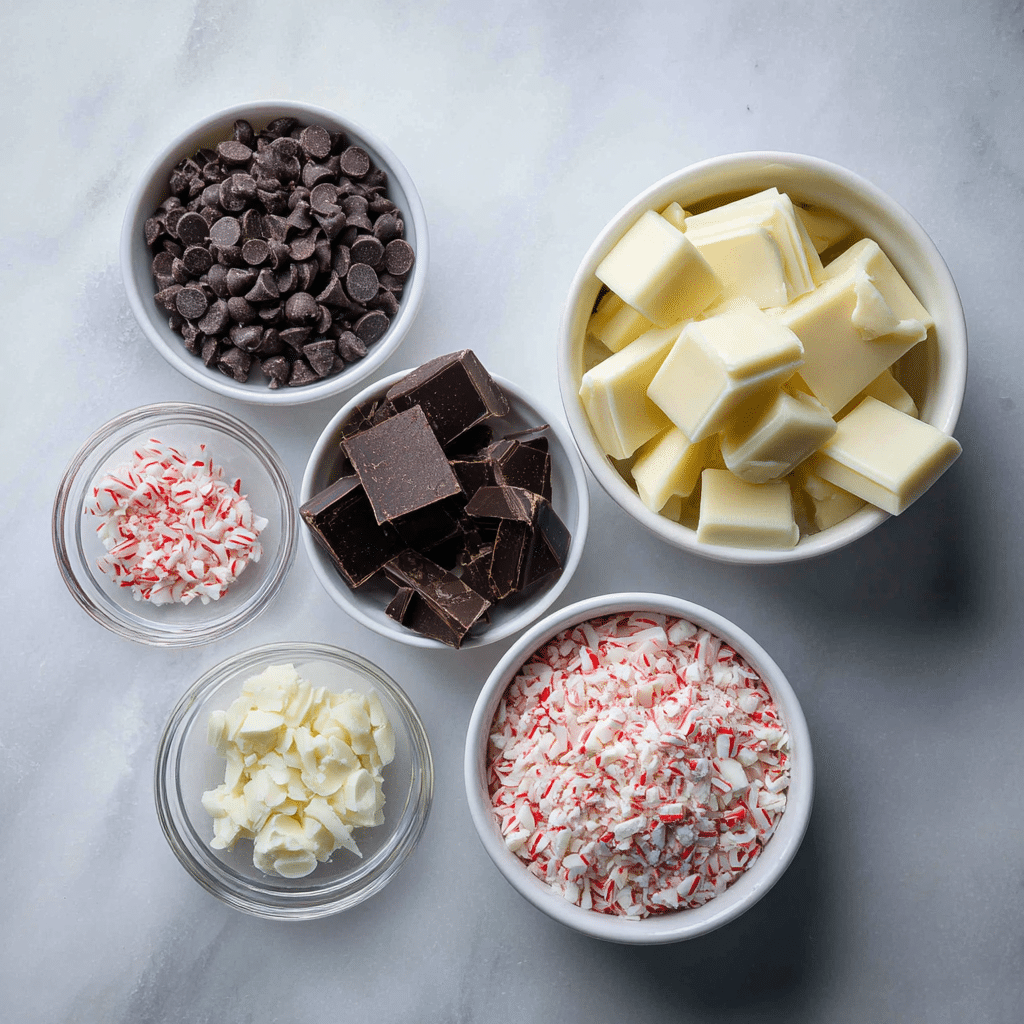
The harmony of smooth, rich chocolate and crisp peppermint makes this bark irresistible. Here’s what you’ll need:
- Dark Chocolate Chips or Chopped Chocolate: 2 cups (12 ounces) — The base layer, providing depth and richness.
- White Chocolate Chips or Chopped Chocolate: 2 cups (12 ounces) — Adds creamy sweetness and beautiful contrast.
- Peppermint Extract: 1 teaspoon — Enhances the cool, fresh flavor of the bark.
- Crushed Candy Canes: 1 cup — For texture, color, and that festive peppermint crunch.
Ingredient Substitutions
Need to swap something out? No problem.
Dark Chocolate: Use milk chocolate for a sweeter bite.
White Chocolate: Swap for vanilla candy coating if needed.
Peppermint Extract: Spearmint extract can work for a softer minty taste.
Candy Canes: Crushed peppermint candies are a perfect replacement.
Ingredient Spotlight
White Chocolate: Not technically chocolate since it lacks cocoa solids, white chocolate brings smooth creaminess and allows the peppermint to shine.
Peppermint Extract: Just a little goes a long way. It brightens the whole dessert and balances the sweetness.
Instructions for Making Peppermint Bark
This is where the fun begins. Melt, spread, sprinkle, and set — it’s as easy and joyful as it sounds.
- Preheat Your Equipment:
No oven needed, but line a baking sheet with parchment paper and clear some fridge space. - Combine Ingredients:
Melt the dark chocolate slowly using a double boiler or microwave. Stir in half the peppermint extract. - Prepare Your Cooking Vessel:
Pour the melted dark chocolate onto the prepared sheet. Spread evenly with a spatula into a rectangle about ¼ inch thick. - Assemble the Dish:
Chill the dark chocolate for 15 minutes. Meanwhile, melt the white chocolate and stir in the remaining extract. Pour over the dark chocolate layer and spread gently. - Cook to Perfection:
Sprinkle crushed candy canes over the top while white chocolate is still soft. Press gently so they stick. - Finishing Touches:
Refrigerate for 30 minutes or until completely firm. - Serve and Enjoy:
Break into pieces and serve. Store in an airtight container or wrap for gifting.
Texture & Flavor Secrets
What makes peppermint bark so addictive is the blend of textures. The chocolate snaps satisfyingly when bitten, and the crushed candy canes add a crunchy, slightly sticky bite. Flavor-wise, the richness of the chocolate is brightened by the refreshing, cool hit of peppermint in every layer.
Cooking Tips & Tricks
Before you head into the kitchen, here are some helpful hints:
- Let chocolate cool slightly before adding the next layer so it doesn’t melt together.
- Chop candy canes roughly for more texture and a homemade look.
- If using microwave, melt chocolate in 20-second bursts, stirring each time.
What to Avoid
Here are a few common pitfalls and how to sidestep them:
- Don’t overheat the chocolate. It can seize and become grainy.
- Avoid spreading white chocolate too soon. Let the dark layer set first.
- Skipping extract leaves the bark a little flat in flavor. Don’t miss it.
Nutrition Facts
Servings: 16
Calories per serving: 210
Note: These are approximate values.
Preparation Time
Prep Time: 10 minutes
Cook Time: 5 minutes
Total Time: 45 minutes (including chilling)
Make-Ahead and Storage Tips
Peppermint bark is a dream for make-ahead planners. You can prepare it days in advance and store it in an airtight container at room temperature for up to two weeks. For longer storage, keep it in the fridge or freezer. Just be sure to separate layers with wax paper to prevent sticking. When gifting, pack it in cellophane or tins for a charming homemade touch.
How to Serve Peppermint Bark
This bark is perfect for dessert trays, cookie swaps, or as a sweet treat after dinner. Try crumbling it over hot chocolate or stirring pieces into homemade whipped cream for a peppermint twist. It also makes a festive addition to ice cream sundaes.
Creative Leftover Transformations
If you find yourself with extra bark, here’s how to repurpose it deliciously:
- Peppermint Brownie Topping: Chop and sprinkle over fresh brownies.
- Holiday Trail Mix: Combine with pretzels, popcorn, and mini marshmallows.
- Bark Mocha: Stir into hot coffee or cocoa for instant minty flavor.
Additional Tips
Want to elevate your bark even more?
- Add a tiny pinch of sea salt for balance.
- Use a cookie cutter to shape bark into festive trees or hearts.
- For gifts, tie stacks with ribbon and tuck into holiday tins.
Make It a Showstopper
Presentation is half the fun. Break bark into irregular shards for a rustic, homemade feel. Layer them in a jar or box lined with parchment paper. For sparkle, dust with edible glitter or shimmer powder before the white chocolate sets.
Variations to Try
Feeling creative? Here are some fun spins:
- Chocolate Orange Bark: Add orange zest and skip the peppermint for a citrusy vibe.
- Triple Chocolate Bark: Use milk, dark, and white chocolate in layered swirls.
- Nutty Bark: Add chopped roasted almonds or pistachios between layers.
- Spicy Peppermint: Add a pinch of cayenne for a heat-kissed twist.
- Marbled Bark: Swirl the two chocolates together before setting for a beautiful pattern.
FAQ’s
Q1: Can I use chocolate chips instead of bars?
A1: Yes, just be sure they’re high quality and melt well.
Q2: How do I crush candy canes without making a mess?
A2: Place them in a zip-top bag and gently crush with a rolling pin.
Q3: Do I have to temper the chocolate?
A3: Not for this recipe. Cooling it slowly in the fridge does the trick.
Q4: Can I skip the white chocolate layer?
A4: Sure, it will just be a darker, bolder peppermint bark.
Q5: What if my layers separate?
A5: Make sure the bottom layer is still slightly tacky when you pour the next one.
Q6: How long does it take to set?
A6: About 30 minutes in the fridge or longer at room temperature.
Q7: Can I freeze peppermint bark?
A7: Absolutely. Just separate pieces with wax paper and seal well.
Q8: What’s the best way to break the bark?
A8: Use your hands or a sharp knife to snap it into chunks.
Q9: Is it gluten free?
A9: Yes, as long as all ingredients are certified gluten free.
Q10: Can kids help make this?
A10: Yes, it’s perfect for little helpers to crush and sprinkle candy.
Conclusion
Peppermint bark is more than just a dessert — it’s a sweet tradition, a gift from the heart, and a holiday favorite for good reason. Trust me, you’re going to love this. So grab your chocolate, crush those candy canes, and let’s make some magic.
Print
Peppermint Bark
- Prep Time: 10 minutes
- Cook Time: 5 minutes
- Total Time: 45 minutes
- Yield: 16 servings 1x
- Category: Dessert
- Method: No-Bake
- Cuisine: American
- Diet: Vegetarian
Description
A festive and irresistible treat, this peppermint bark features layers of smooth dark and white chocolate topped with crunchy crushed candy canes. Perfect for gifting or snacking during the holidays.
Ingredients
- 2 cups dark chocolate chips or chopped chocolate
- 2 cups white chocolate chips or chopped chocolate
- 1 teaspoon peppermint extract
- 1 cup crushed candy canes
Instructions
- Line a baking sheet with parchment paper and prepare fridge space for chilling.
- Melt dark chocolate in a double boiler or microwave in short bursts. Stir in ½ teaspoon of peppermint extract.
- Spread melted dark chocolate onto the parchment-lined baking sheet in a ¼-inch thick layer.
- Chill for 15 minutes until slightly set.
- Melt white chocolate and stir in remaining ½ teaspoon peppermint extract.
- Pour white chocolate over the dark layer, spreading evenly.
- Sprinkle crushed candy canes over the top while the white chocolate is soft. Press gently to set.
- Chill for 30 minutes or until fully firm.
- Break into pieces and serve or store in an airtight container.
Notes
- Use high-quality chocolate for best results.
- Crush candy canes just before use to maintain texture.
- Chill each layer before adding the next to prevent blending.
- Add a pinch of sea salt or edible glitter for extra flair.
Nutrition
- Serving Size: 1 piece
- Calories: 210
- Sugar: 22g
- Sodium: 35mg
- Fat: 12g
- Saturated Fat: 7g
- Unsaturated Fat: 4g
- Trans Fat: 0g
- Carbohydrates: 25g
- Fiber: 1g
- Protein: 2g
- Cholesterol: 3mg
Keywords: peppermint bark, holiday treat, no-bake dessert, chocolate peppermint, Christmas candy