Homemade Slider Buns
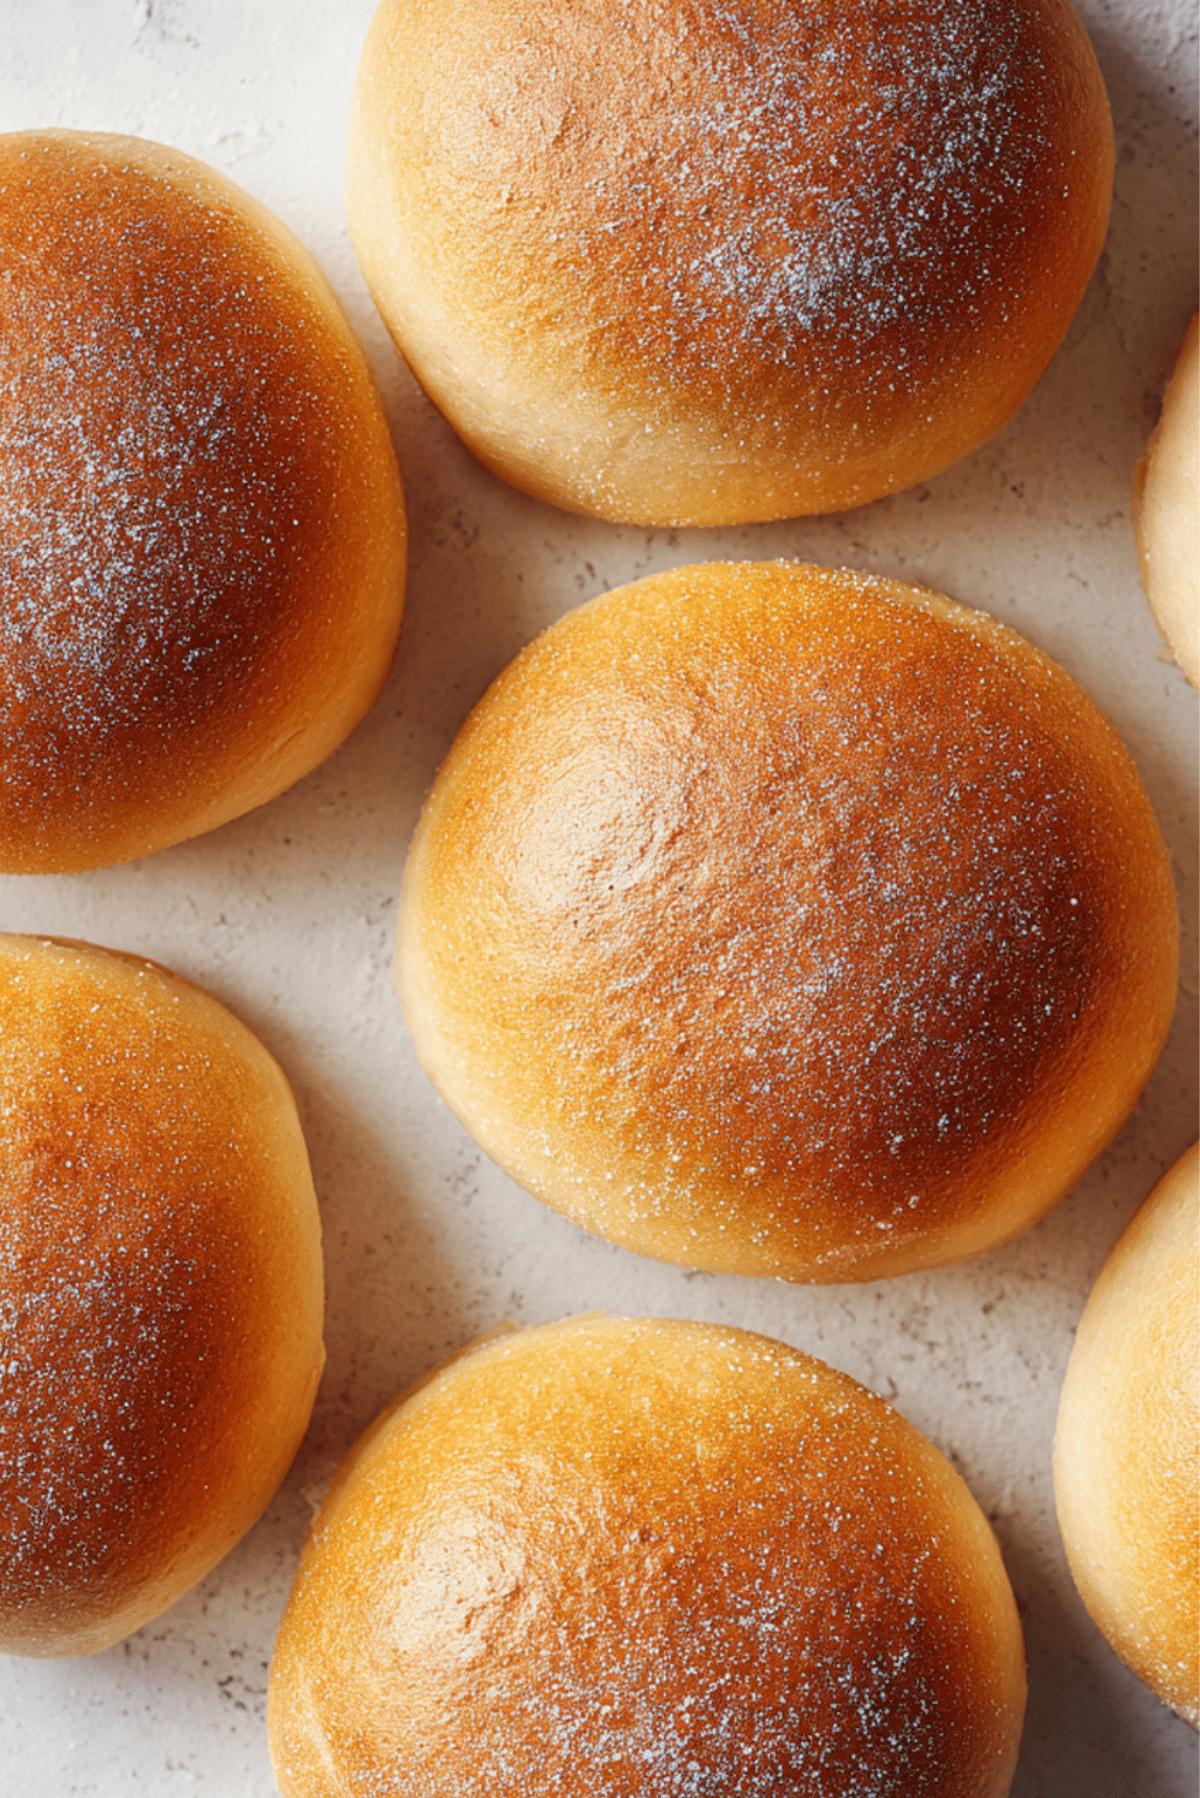
There is something deeply comforting about pulling a tray of freshly baked slider buns from the oven. The kitchen fills with that warm, slightly sweet bread aroma, and suddenly everything feels slower and cozier. These homemade slider buns are soft, fluffy, and perfectly golden, made to cradle your favorite fillings without stealing the spotlight. Trust me, you’re going to love this, because once you try them warm with a little butter, store bought buns will never feel the same again.
Behind the Recipe
This recipe came from countless afternoons spent experimenting with dough, chasing that perfect balance between soft and sturdy. I wanted buns that felt bakery worthy but still approachable for a regular home kitchen. After a few sticky counters and many happy taste tests, this version became a keeper, the kind you make once and then keep coming back to for every gathering.
Recipe Origin or Trivia
Slider buns became popular alongside the rise of sliders themselves, those small but mighty sandwiches that pack big flavor into a few bites. Originally tied to American diners and casual gatherings, slider buns are designed to be tender yet strong enough to hold fillings. Over time, home bakers embraced them, adding richer doughs and softer crumbs, which is exactly where this recipe shines.
Why You’ll Love Homemade Slider Buns
These buns earn their spot in your recipe box for more than one reason, and now let’s dive into why they truly stand out.
Versatile: These buns work beautifully with burgers, pulled vegetables, or even breakfast fillings like eggs and cheese.
Budget-Friendly: Simple pantry ingredients come together to create something that feels special without costing much.
Quick and Easy: The steps are straightforward, making this a great bread recipe even if you’re new to baking.
Customizable: You can keep them classic or brush them with butter or sprinkle seeds on top.
Crowd-Pleasing: Soft, fluffy buns are always a hit, especially at parties or family dinners.
Make-Ahead Friendly: You can bake them earlier in the day and reheat gently before serving.
Great for Leftovers: These buns stay soft and are perfect for next day sandwiches.
Chef’s Pro Tips for Perfect Results
Before we get our hands into the dough, here are a few insider tips that make all the difference. Use warm milk, not hot, to keep the yeast happy. Knead until the dough feels smooth and elastic, which gives you that airy crumb. Finally, let the dough rise fully, because patience here means fluffier buns later.
Kitchen Tools You’ll Need
Having the right tools nearby makes the process smooth and enjoyable.
Mixing Bowl: A large bowl gives the dough space to come together and rise comfortably.
Measuring Cups and Spoons: Accurate measurements keep the dough balanced and consistent.
Baking Sheet: A sturdy sheet helps the buns bake evenly.
Parchment Paper: Prevents sticking and keeps cleanup easy.
Clean Kitchen Towel: Perfect for covering the dough while it rises.
Ingredients in Homemade Slider Buns
The beauty of these buns comes from how simple ingredients work together in harmony, each one playing an important role.
- All-Purpose Flour: 3 cups, forms the structure while keeping the buns tender.
- Warm Milk: 1 cup, adds moisture and richness to the dough.
- Active Dry Yeast: 2 and 1/4 teaspoons, helps the buns rise and become fluffy.
- Granulated Sugar: 2 tablespoons, lightly sweetens the dough and feeds the yeast.
- Unsalted Butter: 3 tablespoons, melted, brings softness and flavor.
- Salt: 1 teaspoon, balances sweetness and enhances overall taste.
- Egg: 1 large, adds richness and helps create a soft crumb.
Ingredient Substitutions
If you need to adjust, there are easy swaps that still deliver great results.
All-Purpose Flour: Bread flour can be used for a slightly chewier texture.
Warm Milk: Unsweetened plant based milk works well for a dairy free option.
Unsalted Butter: Use a neutral oil or dairy free butter alternative if needed.
Ingredient Spotlight
Active Dry Yeast: This is the heart of the recipe, creating that light and airy texture that makes slider buns irresistible.
Unsalted Butter: Adds richness and keeps the buns soft even after they cool.

Instructions for Making Homemade Slider Buns
Now let’s dive into the fun part, making these buns from scratch step by step.
- Preheat Your Equipment: Preheat your oven to 375°F and line a baking sheet with parchment paper.
- Combine Ingredients: In a large bowl, mix warm milk, sugar, and yeast, then let it sit until foamy.
- Prepare Your Cooking Vessel: Add melted butter, egg, salt, and flour to the bowl, mixing until a dough forms.
- Assemble the Dish: Knead the dough until smooth, then cover and let it rise until doubled in size.
- Cook to Perfection: Divide the dough into equal pieces, shape into buns, and place on the baking sheet.
- Finishing Touches: Bake until golden brown and fragrant.
- Serve and Enjoy: Let cool slightly before serving warm.
Texture & Flavor Secrets
The magic of these slider buns is in the contrast. The exterior is lightly golden and soft, while the inside stays pillowy and airy. The gentle sweetness from the sugar and milk rounds everything out, making each bite balanced and comforting.
Cooking Tips & Tricks
A few small tips can elevate your buns even more.
- Let the dough rise in a warm, draft free spot.
- Space the buns close together for softer sides.
- Brush with melted butter after baking for extra softness.
What to Avoid
Even simple bread has a few pitfalls, but they are easy to avoid.
- Overheating the milk, which can stop the yeast from working.
- Adding too much flour, which can make the buns dense.
- Skipping the rise time, which affects fluffiness.
Nutrition Facts
Servings: 12 buns
Calories per serving: 180
Note: These are approximate values.
Preparation Time
Prep Time: 20 minutes
Cook Time: 18 minutes
Total Time: 1 hour and 40 minutes
Make-Ahead and Storage Tips
These buns can be made ahead and stored in an airtight container for up to two days at room temperature. For longer storage, freeze them once cooled and reheat gently in the oven when needed.
How to Serve Homemade Slider Buns
Serve these buns warm with classic sliders, veggie fillings, or even as mini breakfast sandwiches. They also pair beautifully with soups and salads for a cozy meal.
Creative Leftover Transformations
Turn leftover buns into mini garlic bread, bread pudding bites, or toasted sandwich sliders the next day. Let me tell you, it’s worth every bite.
Additional Tips
For extra shine, brush the buns with milk before baking. If you like a softer crust, cover them loosely while cooling.
Make It a Showstopper
Arrange the buns in a basket lined with a clean cloth, and serve them warm at the table. A simple presentation makes them feel special and inviting.
Variations to Try
Try adding sesame seeds on top for a classic look. Swap in whole wheat flour for a heartier bun. Add a touch of honey for extra sweetness. Shape them slightly larger for small sandwiches.
FAQ’s
1. Can I make the dough ahead of time?
Yes, you can refrigerate the dough after the first rise and bake the next day.
2. Can I freeze slider buns?
Absolutely, freeze them fully cooled and reheat as needed.
3. Why are my buns dense?
Dense buns usually mean the dough did not rise long enough.
4. Can I use instant yeast?
Yes, just skip the proofing step and mix it directly with dry ingredients.
5. How do I keep buns soft?
Store them in an airtight container once cooled.
6. Can I make them larger?
Yes, divide the dough into fewer pieces for bigger buns.
7. Do I need a stand mixer?
No, this dough is easy to knead by hand.
8. Can I add toppings?
Yes, seeds or a butter glaze work well.
9. How do I know when they’re done?
They should be golden and sound hollow when tapped.
10. Can I make them dairy free?
Yes, use plant based milk and butter alternatives.
Conclusion
Homemade slider buns bring a sense of warmth and pride to any meal. They are soft, flavorful, and surprisingly simple to make, turning everyday sandwiches into something memorable. This one’s a total game-changer, and once you bake them, you’ll find yourself making them again and again.
Print
Homemade Slider Buns
- Prep Time: 20 minutes
- Cook Time: 18 minutes
- Total Time: 1 hour 40 minutes
- Yield: 12 slider buns 1x
- Category: Bread
- Method: Baking
- Cuisine: American
- Diet: Vegetarian
Description
Soft, fluffy homemade slider buns with a lightly golden crust, perfect for burgers, sandwiches, or party sliders. These buns are easy to make and bring fresh bakery flavor straight to your kitchen.
Ingredients
- 3 cups all-purpose flour
- 1 cup warm milk
- 2 1/4 teaspoons active dry yeast
- 2 tablespoons granulated sugar
- 3 tablespoons unsalted butter, melted
- 1 teaspoon salt
- 1 large egg
Instructions
- In a large bowl, combine warm milk, sugar, and yeast. Let sit for 5 to 10 minutes until foamy.
- Add melted butter, egg, salt, and flour. Mix until a soft dough forms.
- Knead the dough for about 8 minutes until smooth and elastic.
- Place the dough in a lightly greased bowl, cover, and let rise until doubled in size.
- Divide dough into equal portions and shape into small buns.
- Arrange buns on a parchment lined baking sheet and let rise for 20 minutes.
- Bake at 375°F for 16 to 18 minutes until golden brown.
- Cool slightly before serving.
Notes
- Brush buns with melted butter after baking for extra softness.
- Store in an airtight container to keep them fresh.
- Freeze fully cooled buns for longer storage.
Nutrition
- Serving Size: 1 bun
- Calories: 180
- Sugar: 4 g
- Sodium: 220 mg
- Fat: 5 g
- Saturated Fat: 3 g
- Unsaturated Fat: 2 g
- Trans Fat: 0 g
- Carbohydrates: 28 g
- Fiber: 1 g
- Protein: 5 g
- Cholesterol: 30 mg
Keywords: homemade slider buns, soft slider buns, bread recipe, burger buns