Chick-Free Pastel
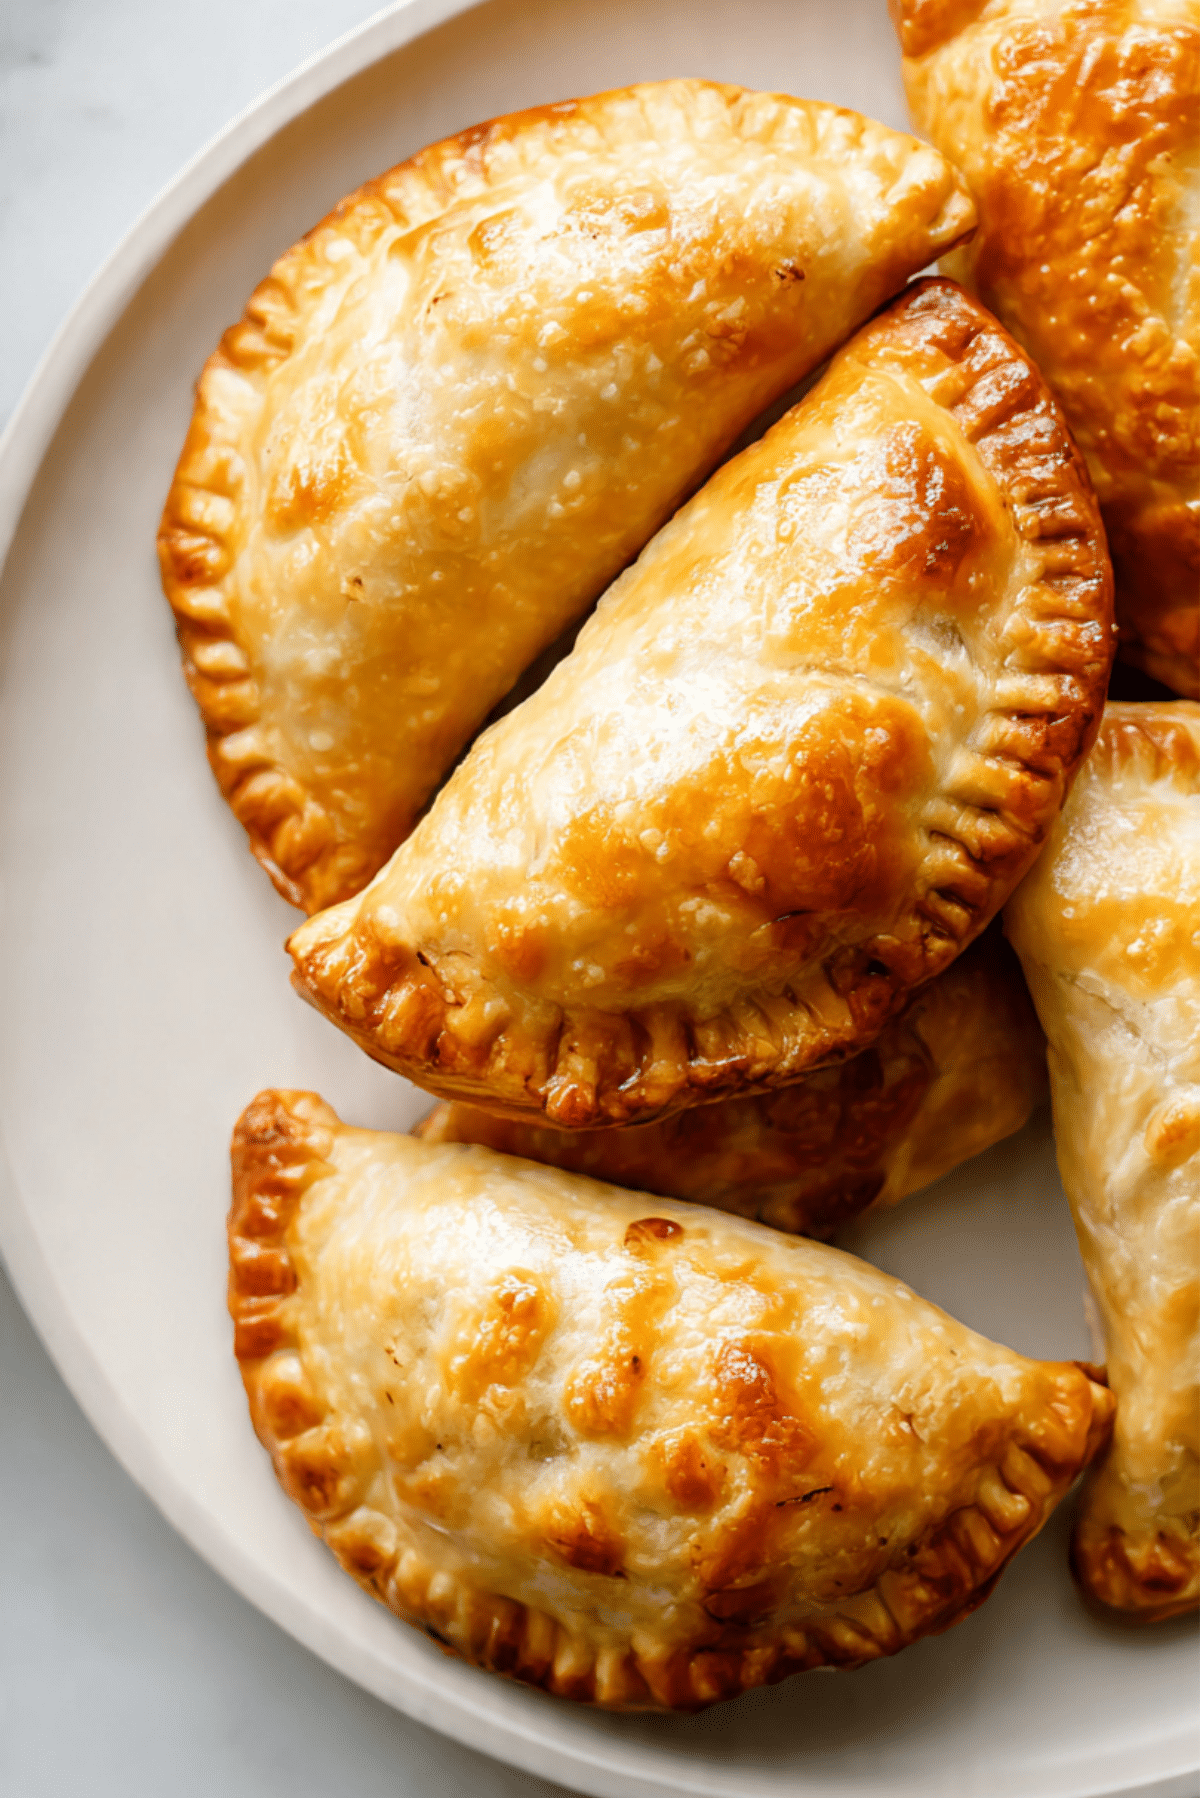
There is something so comforting about biting into a warm, golden pastry and discovering a creamy, savory filling tucked inside. Chick-Free Pastel brings all that joy without any chicken at all, and trust me, you’re going to love this. The crust shatters gently under your teeth, the inside is rich and flavorful, and every bite feels like a little celebration. This one’s a total game-changer, especially if you are craving that classic bakery feel but want a plant based twist that still feels indulgent and satisfying.
A Crispy Little Pocket of Comfort You Will Crave Again and Again
What makes this so special is the contrast. You get that beautifully baked, flaky exterior, lightly golden and slightly crisp at the edges. Then you reach the filling, creamy chickpeas seasoned just right, with hints of garlic and warm spices that wrap around you like a cozy kitchen hug. It smells amazing as it bakes, and when you pull it out of the oven, it is almost impossible to wait.
And now let’s dive a little deeper into where this kind of treat comes from and why it holds such a special place in so many kitchens.
A Taste of Tradition with a Modern Plant Based Twist
Pastel style hand pies are beloved in many cultures, especially across Latin America, where they are often fried or baked and filled with savory mixtures. Traditionally, many versions include meat, but home cooks everywhere have always adapted fillings based on what they had on hand.
This chickpea version keeps that spirit alive. Chickpeas bring a hearty texture that mimics classic fillings, while keeping everything vegetarian and budget friendly. It is a beautiful example of how traditional comfort food can evolve while still honoring its roots.
And speaking of comfort, let me tell you exactly why this version works so well.
Why This Recipe Works Every Single Time
Before we head into the kitchen, let’s talk about why this is such a reliable favorite.
Versatile: You can serve these as a snack, appetizer, or even a light meal with a salad. They fit almost any occasion.
Budget-Friendly: Chickpeas, basic spices, and simple dough ingredients keep costs low without sacrificing flavor.
Quick and Easy: The filling comes together fast, and the assembly is simple enough for beginners.
Customizable: Add different spices, herbs, or even a little plant based cheese to make it your own.
Crowd-Pleasing: Crispy pastry and creamy filling is a combination that wins people over instantly.
Make-Ahead Friendly: You can prepare them in advance and bake when needed.
Great for Leftovers: They reheat beautifully and taste just as good the next day.
Now that you know why this works so well, let me share a few insider tricks to make yours even better.
Chef Secrets for Perfectly Flaky Pastel Every Time
A few small details can make a big difference.
- Keep your dough cold before baking, this helps create a flaky texture.
- Do not over mash the chickpeas, leave a bit of texture for a more satisfying bite.
- Taste the filling before assembling, adjust salt and spices while it is still in the pan.
- Seal the edges firmly with a fork so the filling stays tucked inside.
- Brush lightly with oil for that gorgeous golden finish.
With those tips in mind, let’s make sure you have the right tools ready.
The Essential Tools You Will Need
Having the right equipment makes everything smoother.
Mixing Bowl: For combining and mashing the chickpea filling.
Skillet: To sauté aromatics and develop flavor in the filling.
Rolling Pin: For rolling out the dough evenly.
Baking Sheet: To hold your assembled pastries while they bake.
Fork: For sealing the edges and creating that classic crimped look.
Now that your kitchen is set, let’s talk ingredients.
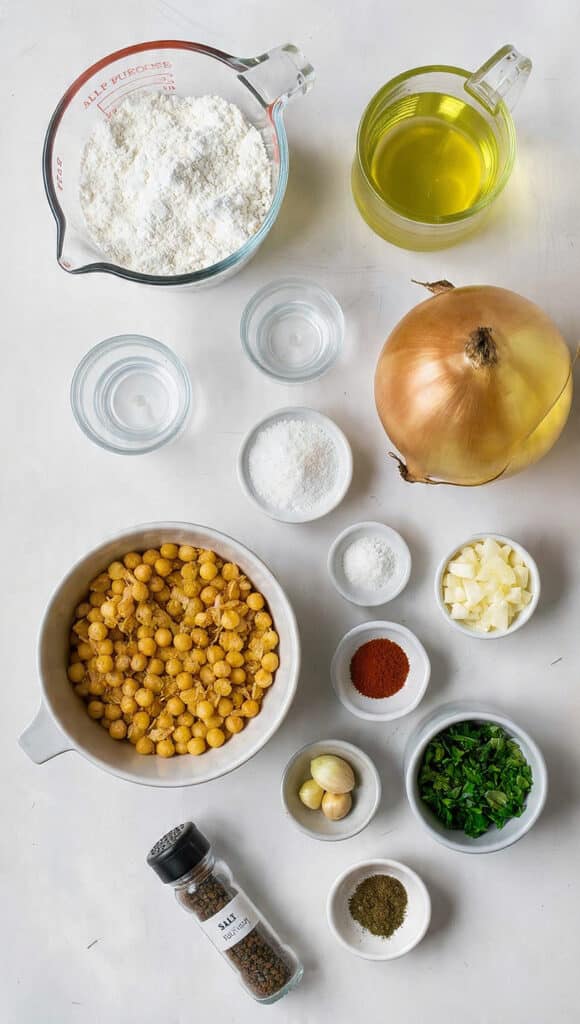
Ingredients You Will Need For This Chick-Free Pastel
Each ingredient plays a role in building layers of flavor and texture.
- All Purpose Flour: 2 cups, forms the base of the dough and gives structure.
- Salt: 1 teaspoon, enhances both dough and filling flavors.
- Vegetable Oil: 1/3 cup for the dough plus 1 tablespoon for sautéing, keeps the crust tender and helps cook the aromatics.
- Warm Water: 1/2 cup, brings the dough together smoothly.
- Cooked Chickpeas: 2 cups, lightly mashed to create a hearty, protein rich filling.
- Small Onion: 1 finely chopped, adds sweetness and depth.
- Garlic Cloves: 2 minced, brings aroma and savory punch.
- Paprika: 1 teaspoon, adds warmth and color.
- Ground Cumin: 1/2 teaspoon, gives earthy richness.
- Black Pepper: 1/2 teaspoon, adds gentle heat.
- Fresh Parsley: 2 tablespoons chopped, brightens the filling.
- Salt for Filling: 1/2 teaspoon, balances the flavors.
If you are missing something, do not worry. Let’s explore a few swaps.
Easy Ingredient Swaps If You Need Them
Cooking should feel flexible, not stressful.
All Purpose Flour: You can use whole wheat flour for a slightly nuttier flavor.
Vegetable Oil: Olive oil works beautifully and adds extra depth.
Chickpeas: White beans can be used for a softer texture.
Fresh Parsley: Cilantro or green onions can add a different fresh note.
Now let’s spotlight the stars of the show.
The Heart of the Flavor
Chickpeas: They create a creamy yet slightly chunky base that feels satisfying and hearty without any meat.
Paprika: This simple spice adds warmth and that inviting golden tone to the filling.
And now, the part you have been waiting for, let’s get cooking.
Let’s Get Cooking
There is something magical about assembling these by hand. It feels rustic and comforting.
- Preheat Your Equipment: Preheat your oven to 375 degrees F and line a baking sheet with parchment paper.
- Combine Ingredients: In a mixing bowl, mash the chickpeas lightly. In a skillet over medium heat, add 1 tablespoon vegetable oil, sauté the onion until soft, then add garlic, paprika, cumin, black pepper, and 1/2 teaspoon salt. Cook for 1 to 2 minutes. Stir this mixture into the chickpeas and add parsley.
- Prepare Your Cooking Vessel: In another bowl, mix flour and 1 teaspoon salt. Add 1/3 cup vegetable oil and warm water, mixing until a soft dough forms. Knead lightly for 2 to 3 minutes until smooth.
- Assemble the Dish: Roll out the dough and cut into circles about 4 to 5 inches wide. Place a spoonful of filling in the center, fold over, and seal edges with a fork.
- Cook to Perfection: Arrange on the baking sheet and bake for 25 minutes or until golden and crisp.
- Finishing Touches: Brush lightly with oil right after baking for extra shine.
- Serve and Enjoy: Let them cool slightly, then serve warm. Let me tell you, it’s worth every bite.
That Perfect Balance of Crispy and Creamy
As they bake, the dough puffs slightly and turns golden. The outside becomes crisp while the inside stays creamy and savory. The sweetness of onion blends with earthy cumin and warm paprika, creating layers of flavor that build with every bite.
Smart Tips to Make It Even Better
- Chill the filled pastries for 10 minutes before baking for extra flakiness.
- Add a squeeze of lemon juice to the filling for brightness.
- Do not overfill or they may open while baking.
What to Avoid for the Best Results
- Avoid over kneading the dough, it can make the crust tough.
- Avoid skipping seasoning, taste and adjust before filling.
- Avoid baking at too high a temperature, it can brown too quickly without cooking through.
Nutrition Snapshot
Servings: 8 pastels
Calories per serving: 220
Note: These are approximate values.
Timing at a Glance
Prep Time: 25 minutes
Cook Time: 25 minutes
Total Time: 50 minutes
Make-Ahead and Storage Tips
You can prepare and fill the pastries, then store them in the refrigerator for up to 24 hours before baking. Once baked, store leftovers in an airtight container in the fridge for up to 3 days. Reheat in the oven at 350 degrees F for 8 to 10 minutes to bring back crispness. They can also be frozen before baking and baked straight from frozen, just add a few extra minutes.
How to Serve Them Like a Pro
Serve warm with a simple tomato salsa, a fresh green salad, or a creamy plant based dip. They also pair beautifully with a light soup for a cozy meal.
Creative Leftover Transformations
Chop leftover pastels and toss into a salad for a crunchy topping. Crumble them slightly and use as a filling for wraps. You can even reheat and serve with scrambled tofu for a savory breakfast plate.
Extra Little Touches That Make a Big Difference
Brush the tops with a little extra oil before baking for deeper color. Sprinkle sesame seeds on top for texture. Always let them rest a few minutes before serving so the filling sets slightly.
Make It a Showstopper
Arrange them on a wooden board with fresh herbs scattered in small bowls nearby. Serve with colorful dips in ramekins for a beautiful contrast. Presentation adds that extra wow factor.
Fun Variations to Try
Add finely chopped spinach to the filling for extra greens.
Mix in a spoonful of plant based cream cheese for added richness.
Spice it up with chili flakes for heat.
Use small cutters to create mini versions for parties.
FAQ’s
Q1: Can I fry instead of bake?
Yes, you can fry in hot oil until golden, about 3 to 4 minutes per side.
Q2: Can I make the dough ahead?
Yes, wrap it tightly and refrigerate for up to 24 hours.
Q3: Are they freezer friendly?
Absolutely, freeze before baking for best texture.
Q4: Can I add vegetables?
Yes, finely chopped bell peppers or spinach work well.
Q5: How do I keep them crispy?
Reheat in the oven instead of the microwave.
Q6: Can I use canned chickpeas?
Yes, just drain and rinse well before using.
Q7: Is this suitable for vegetarians?
Yes, it is completely vegetarian.
Q8: Can I make them gluten free?
Use a gluten free flour blend designed for baking.
Q9: Why is my dough tough?
It may have been over kneaded, mix gently next time.
Q10: Can I serve them cold?
They taste best warm, but can be enjoyed at room temperature.
Conclusion
Chick-Free Pastel brings together crisp pastry and creamy, flavorful filling in a way that feels comforting and exciting all at once. It is simple, satisfying, and endlessly adaptable. Once you make it, you will see how easily it fits into your regular rotation. Trust me, this is one of those recipes you will come back to again and again.
Print
Chick-Free Pastel
- Prep Time: 25 minutes
- Cook Time: 25 minutes
- Total Time: 50 minutes
- Yield: 8 pastels 1x
- Category: Snack
- Method: Baking
- Cuisine: Latin Inspired
- Diet: Vegetarian
Description
Golden, flaky hand pies filled with a creamy and savory chickpea mixture, baked until crisp and perfect for snacking or light meals.
Ingredients
- 2 cups all purpose flour
- 1 teaspoon salt
- 1/3 cup vegetable oil
- 1/2 cup warm water
- 2 cups cooked chickpeas
- 1 small onion, finely chopped
- 2 garlic cloves, minced
- 1 teaspoon paprika
- 1/2 teaspoon ground cumin
- 1/2 teaspoon black pepper
- 2 tablespoons fresh parsley, chopped
- 1/2 teaspoon salt for filling
- 1 tablespoon vegetable oil for sautéing
Instructions
- Preheat oven to 375 degrees F and line a baking sheet with parchment paper.
- Lightly mash the chickpeas in a mixing bowl and set aside.
- Heat 1 tablespoon vegetable oil in a skillet over medium heat, sauté the onion until soft, then add garlic, paprika, cumin, black pepper, and 1/2 teaspoon salt. Cook for 1 to 2 minutes.
- Stir the sautéed mixture into the mashed chickpeas and mix in chopped parsley.
- In a separate bowl, combine flour and 1 teaspoon salt. Add 1/3 cup vegetable oil and warm water, mixing until a soft dough forms. Knead lightly for 2 to 3 minutes until smooth.
- Roll out the dough and cut into 4 to 5 inch circles.
- Place a spoonful of filling in the center of each circle, fold over, and seal the edges with a fork.
- Arrange on the prepared baking sheet and bake for 25 minutes or until golden and crisp.
- Brush lightly with oil after baking, cool slightly, then serve warm.
Notes
- Chill assembled pastries for 10 minutes before baking for extra flakiness.
- Add a squeeze of lemon juice to the filling for brightness.
- Reheat in the oven to maintain crisp texture.
Nutrition
- Serving Size: 1 pastel
- Calories: 220
- Sugar: 2g
- Sodium: 320mg
- Fat: 9g
- Saturated Fat: 1.5g
- Unsaturated Fat: 7g
- Trans Fat: 0g
- Carbohydrates: 29g
- Fiber: 4g
- Protein: 6g
- Cholesterol: 0mg
Keywords: chick-free pastel, chickpea hand pies, vegetarian pastel, baked savory pastry, plant based snack